
Create Your First Company Regular Route
A regular route turns a flight you want to repeat into a weekly service. You choose the airports, operating days, aircraft, crew and capacity; OnAir creates the scheduled flights for that service. This chapter takes you from an empty route to its first scheduled occurrence, then shows how to monitor it.
15.1 Creating Your First Company Regular Route
We deliberately use a Cessna 172 for the exercise. It is an accessible way to learn the controls with a small load, one pilot and a short flight. Its range, speed and carrying capacity limit the services it can operate. Regular routes are also well suited to larger aircraft, including regional aircraft and airliners: the same workflow supports more passengers, multiple cabin classes, more freight and larger crews. The A380 example at the end shows that change of scale.
You do not have to buy a Cessna to follow along. Use a suitable aircraft already in your company and adapt the airports, capacity and timings to it.
Before you start
You should already know how to prepare and register a normal OnAir flight. For a refresher, read Dispatch — prepare the flight (Chapter 3) and Fly & register the flight (Chapter 3).
Have these ready:
- A company in Advanced / company-management mode.
- An aircraft in your company fleet, with a configuration suitable for the service. A temporary Freelance aircraft cannot be selected here.
- A qualified pilot and any required copilot or cabin crew.
- A departure airport, a different destination, and a suitable alternate.
- Funds for the aircraft's operation, fuel, maintenance, crew and applicable airport slots.
For AI operation, your world must permit AI pilots. For a flight you will fly yourself, use an aircraft available in your simulator and select your own pilot.
The tutorial service
| Setting | Our example |
|---|---|
| Route number | 9001 — use an unused number in your company |
| Tag | Academy - First Route |
| Aircraft | Cessna 172 Skyhawk, N14599 in the screenshots |
| Departure | TFFF, Le Lamentin |
| Destination | TFFR, Le Raizet |
| Alternate | TFFM, Marie Galante |
| Operating day | Thursday |
| Departure | 08:00 UTC |
| Arrival | 09:21 UTC in this example, using the reference-duration adjustment |
| Departure slot | Starts 08:00 UTC, duration 01:00 |
| Arrival slot | Starts 09:00 UTC, duration 01:00 |
| Offered capacity | 2 economy seats, no business or first-class seats, 0 lbs cargo |
| Pilot | Your own avatar |
| Operations | Fly in Simulator: Yes, Auto Pricing: Yes |
These are training inputs, not a promise of profit or a universal flight plan. Check the selected aircraft, airport suitability, weather and fuel requirements for your own flight. The forecast and reference duration can differ from the values pictured here.
Step 1. Open Routes and understand what you are creating
1. Open Operations Centre → Routes.
2. Check the company name at the top of the page.
3. Locate New Route. Use this for the first exercise; Generate Set is intended for creating a group of services.
4. Click New Route to open Regular Route Settings in edit mode.
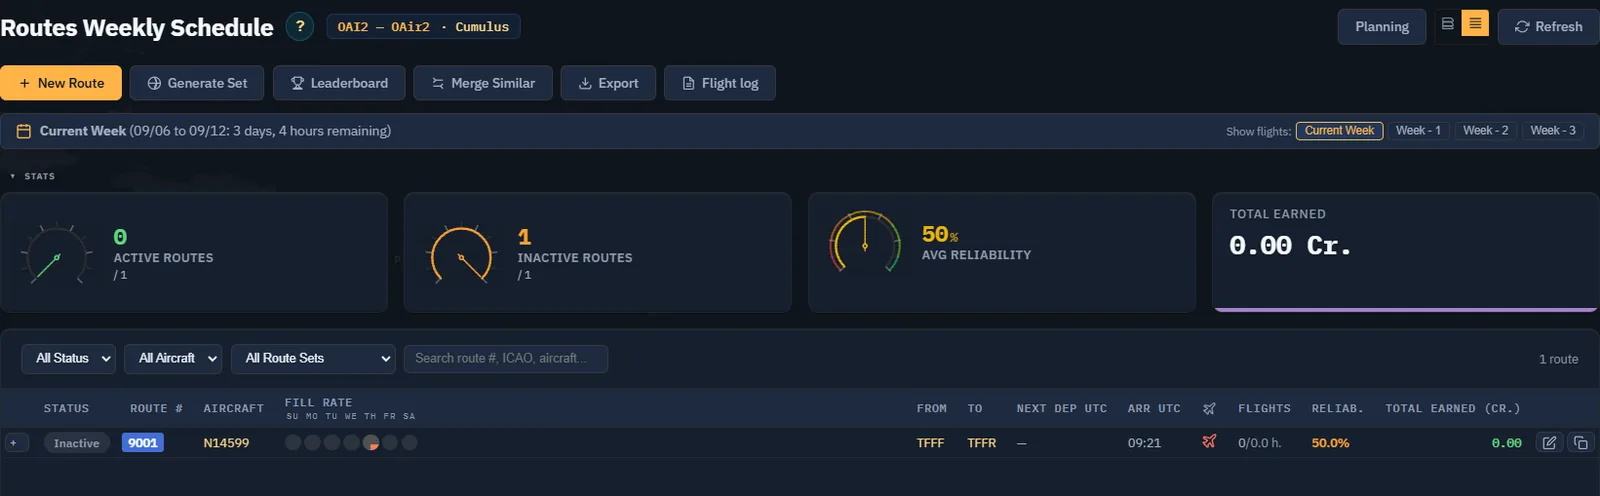
Three objects are easy to confuse:
| Object | What it means |
|---|---|
| Company regular route | The repeating service you configure in this chapter. |
| Scheduled flight / occurrence | One dated execution of that service, with its own status and journal. |
| Freelance route | A schedule you take as a freelance pilot; it is a separate workflow. |
A company regular route generates its own passenger and freight demand. It does not collect your existing factory goods or accepted Company Jobs. Use dispatch or Work Orders to move those loads.
Checkpoint: you are editing a company route, not accepting a Freelance schedule. Creating the entry does not activate the service. If you abandon a new entry, check the Routes list: the initial inactive entry can remain there.
Step 2. Choose one day, one aircraft and a clear identity
1. Under Activation days, select Thursday for this exercise. Leave the other days unselected.
2. Select your company aircraft under Aircraft.
3. Enter an unused Route #, such as 9001.
4. Enter Academy - First Route in Tag. A tag helps you find related routes later.
5. Optionally choose a colour to recognise the service in the list and planning grid.
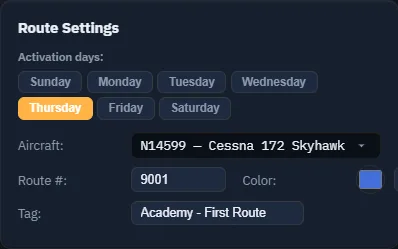
A route describes one direction. TFFF → TFFR does not include the return to TFFF. Before repeating the service, plan how the aircraft and crew will return to the departure airport. A separate return route, a Work Order or a manually flown positioning leg can serve that purpose.
Checkpoint: the selected aircraft is the one you intend to operate, and the tag clearly identifies your exercise.
Step 3. Set the departure airport and its slot
1. In Departure, enter TFFF in ICAO.
2. Wait for the airport name and size to resolve. Check that the result is Le Lamentin.
3. Set Time (UTC) to 08:00.
4. Check Slot Start (UTC) and Duration. For the exercise, use 08:00 and 01:00.
5. Leave the time field to commit what you typed, then check its displayed value.
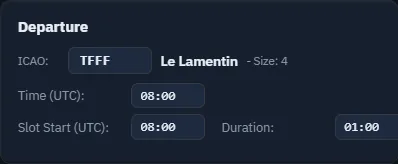
Think of Time as the planned departure and Slot Start + Duration as the permitted time window. A slot also belongs to the operating day: a Thursday window is not permission to fly at that hour on any day of the week.
Use the Companion's UTC clock as your reference when comparing the schedule with the current time. A local clock can show a different date near midnight, so check the weekday as well as the hour.
The Companion adjusts slot starts when you change scheduled times. Always re-read them after changing the timetable. Airports of size 0 or 1 have no slot fee or timing penalty; the two larger airports in this exercise use slots.
Checkpoint: the airport is resolved, the time is correct, and the departure falls inside its intended window.
Step 4. Set the destination and a realistic arrival
1. In Arrival, enter TFFR and wait for Le Raizet to resolve.
2. Enter a reasonable arrival time for your aircraft and route.
3. If a duration discrepancy appears, read it. Adjust applies the application's reference arrival time.
4. Recheck the saved time and the arrival slot after adjustment.
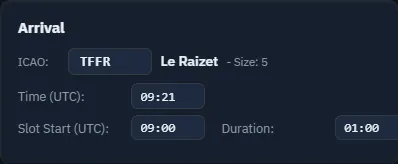
The reference duration is a scheduling aid. Your actual flight still needs suitable fuel, weather and operational planning. Do not copy the Cessna timing to a different aircraft without checking it.
Checkpoint: the departure and arrival times differ, and the timetable is plausible for the selected aircraft.
Step 5. Choose an alternate and inspect the map
1. In Alternate, enter TFFM.
2. Wait for Marie Galante to resolve.
3. Check that your aircraft can use it. For your actual flight, also check weather, runway and fuel requirements.
4. Inspect the route map to confirm you have selected the intended airports.
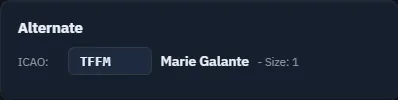

The alternate also affects the weight estimate because the calculation includes fuel for the leg and alternate. Select it before judging whether the aircraft has enough capacity.
Checkpoint: all three airports are resolved and appropriate to the aircraft you selected.
Step 6. Decide who will fly
1. Under Operations, set Fly in Simulator to Yes for this exercise.
2. Leave Force Crew Rest off for the example using your own avatar.
3. Under Default Crew, select your own pilot.
4. On a different aircraft, also provide the qualified copilot and cabin crew required by its configuration and the seats you offer.
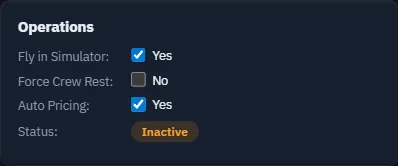
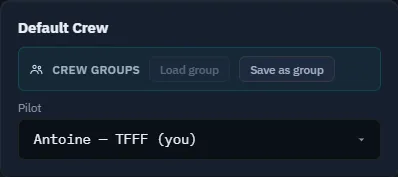
For an AI-operated route, choose a suitable AI pilot and switch Fly in Simulator off, provided your world supports AI flying. Check where the aircraft and crew are and whether they are available. A green activation checklist is not a guarantee that an employee will be ready at every future departure.
Employee duty and rest matter when you grow into repeated or long flights. Read Crew duty and rest (section 15.3) before building a full day of AI operations.
Checkpoint: you know whether this service will wait for you in the simulator or be operated by AI.
Step 7. Offer a load the aircraft can carry
1. In Capacity & Pricing, enter 2 Eco Seats.
2. Set Bus Seats and First Seats to 0.
3. Set Cargo (lbs) to 0 for the first exercise. If your settings display another unit, follow the unit shown by the field.
4. Read Weight check after the aircraft and airports have resolved.
5. Leave a useful margin for your actual flight preparation.
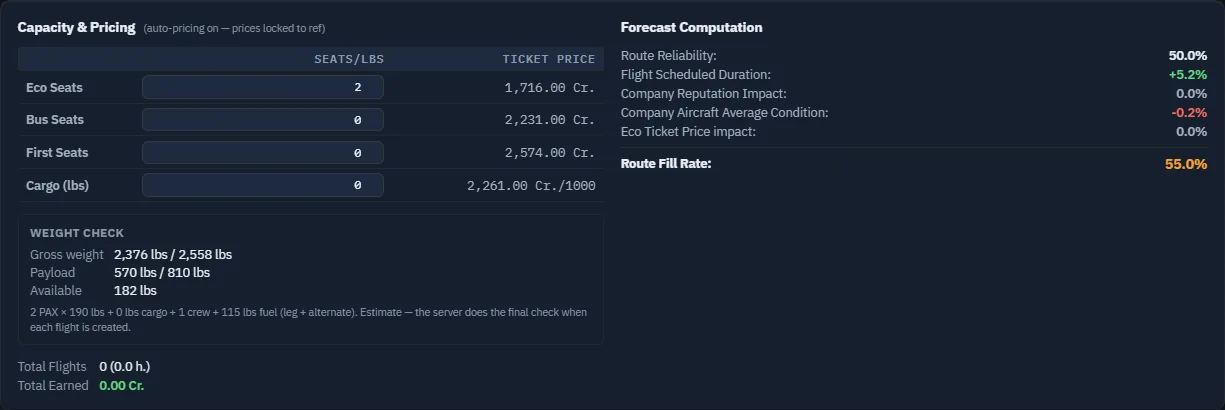
The offered seats and cargo are the service's capacity. They are not guaranteed sales. The forecast estimates demand; the weight check estimates whether your offered load fits the aircraft. You need to read both.
In this example, Available was 182 lbs. Adding cargo uses that margin. A negative value is a reason to revise the plan before activation, even when the route can still be saved.
Read Capacity, fuel and weight (section 15.2) for the worked calculation and an illustrated overload example.
Checkpoint: the load fits and you understand how much margin remains.
Step 8. Read demand and pricing before committing
1. Leave Auto Pricing on for the first exercise.
2. Inspect Departure PAX heatmap. Switch to Departure Cargos heatmap if you are considering freight.
3. Read Forecast Computation after it refreshes.
4. Check the effects of reliability, scheduled duration, company reputation, aircraft condition and pricing where displayed.
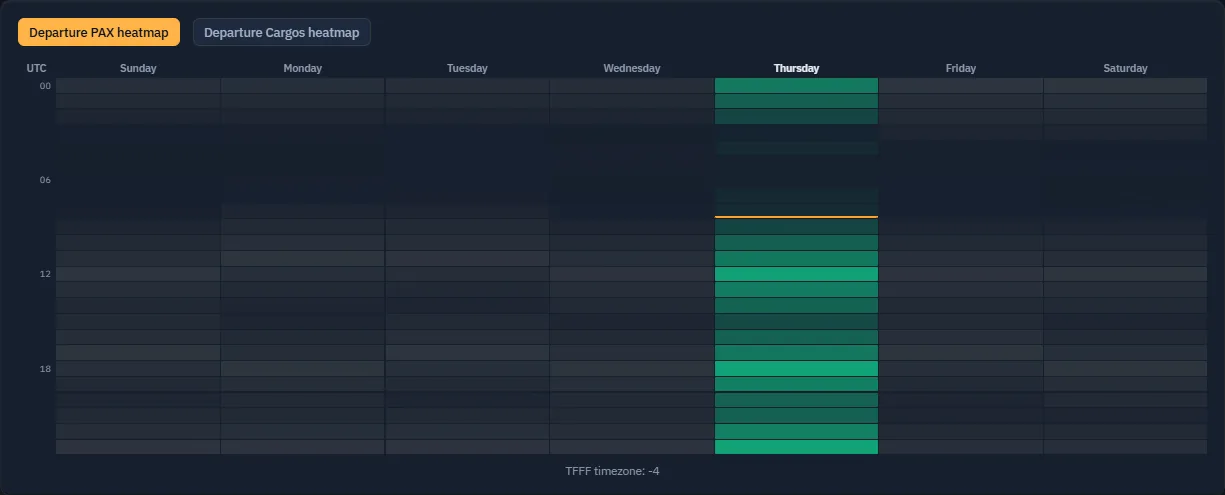
With automatic pricing enabled, price fields follow reference prices rather than values you type yourself. In our saved training route, Route Fill Rate was 55.0%. That is a forecast, not a guaranteed occupancy or profit margin. In particular, ticket revenue is not the same as profit after fuel, maintenance, crew and other costs.
If the forecast reports an error or cannot be calculated, resolve that message before relying on the number. Do not treat an incomplete or outdated figure as a confirmed result.
Checkpoint: you can explain what the forecast predicts and what costs remain outside that percentage.
Step 9. Save and read the result
1. Scroll to the top of the page.
2. Click Save Route.
3. Wait for the route to return to view mode.
4. Re-read the aircraft, operating day, airports, times, capacity and crew.


If Save reports an error, read it and correct the relevant field. Departure and destination must be different, and at least one operating day must be selected. Do not move on merely because the form still contains what you typed.
Checkpoint: the route is saved, and its displayed values match your intended service.
Step 10. Check readiness, then activate
1. Read every item in the pre-activation checklist.
2. Fix missing aircraft, pilot, capacity, airport or slot information.
3. Check Weight check and crew availability separately.
4. Click Activate Route when you are ready to operate the service.
5. Verify that the action changes to Deactivate Route and that Operations → Status reads Active.

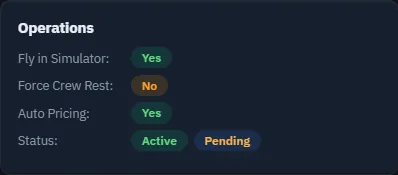
Activation is not take-off. A saved aircraft assignment, a resting employee and a future departure can coexist with an active route. The individual flight must still satisfy its own operating conditions.
Checkpoint: activation succeeded and you can distinguish the route's state from a flight's state.
Step 11. Find the first scheduled flight
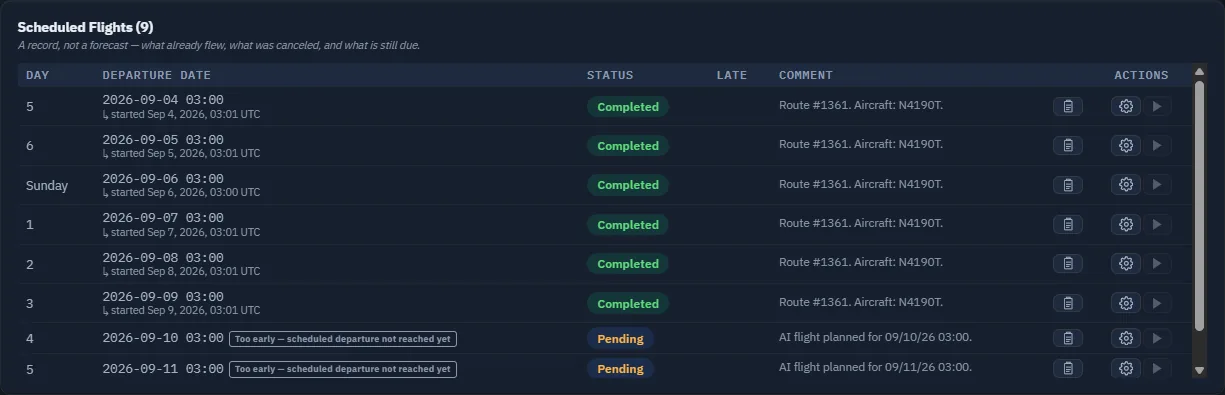
1. Scroll to Scheduled Flights.
2. Locate the new dated occurrence.
3. Check its departure date, status and comment.
4. Read the timing explanation beside a Pending flight before interpreting it as a failure.

For a simulator-operated occurrence, the available Fly Now action prepares the route mission and normally opens Flight Dispatch with the aircraft, destination, alternate and load. Continue with the dispatch and tracking procedure you already learned. Do not assume that accepting the occurrence means your simulator is ready to start tracking.
A simulator occurrence can be flown before the end of the current schedule week, as its comment explains. That flexibility does not erase the slot's day and time conditions: flying on another day can incur timing penalties at both ends. For AI flights, a future scheduled departure is a normal reason to remain Pending.
The dates in the screenshot belong to the capture week. Follow the current-week dates shown in your own app.
Checkpoint: you can find the occurrence and explain its status. A completed simulator flight and registration are the next operational exercise; they are not demonstrated by an activation screenshot.
Step 12. Monitor a service over time
After flights have run:
1. Reopen the route and compare its scheduled flights.
2. Read the status and latest comment on any occurrence needing attention.
3. Open its journal for the full explanation rather than guessing from the status colour.
4. Return to Routes and use the week selectors to review the current or previous weeks.
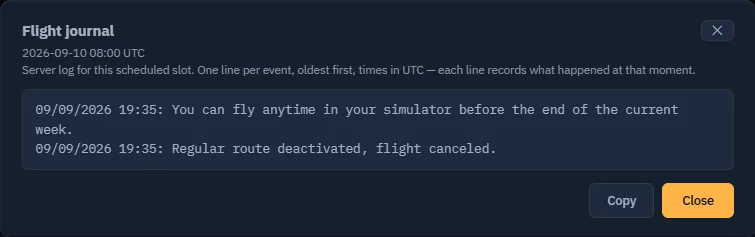
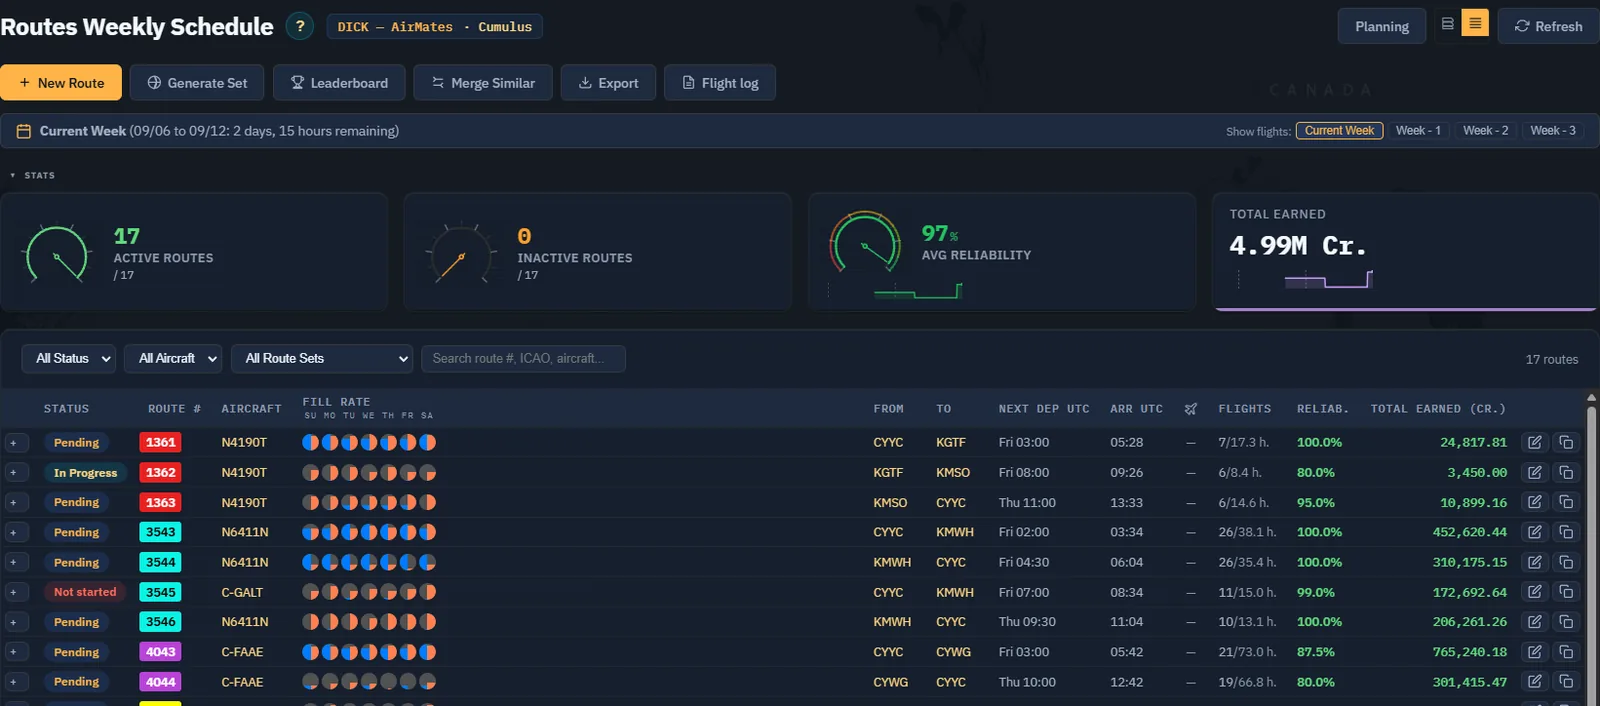
For an AI-flown company regular route, fuel is bought automatically at departure and charged to the company operating the aircraft. One FBO must hold the whole purchase: your own eligible FBO is preferred, then your VA's, otherwise the cheapest eligible supplier. If none has enough, nothing is bought. The flight needs onboard fuel for the destination, alternate and 30 minutes of cruise; otherwise it remains Not started, and the journal explains the fuel shortage. Check stock and arrange supply before retrying. For Fly in Simulator, prepare fuel yourself through dispatch. Company regular routes are separate from Freelance Routes and do incur operating costs.
If a flight fails repeatedly, investigate load, fuel, aircraft position, maintenance, crew availability and scheduling conflicts. Repeated activation clicks do not repair those conditions. Use the actual journal message to choose the next check.
Checkpoint: you know where to find the reason for an occurrence's outcome.
Step 13. Look at the week before expanding
1. On Routes, click Planning.
2. Find the aircraft's row and its operating days.
3. Find the crew rows and check that assignments fit together.
4. Inspect any conflict or rest indication before adding another service.
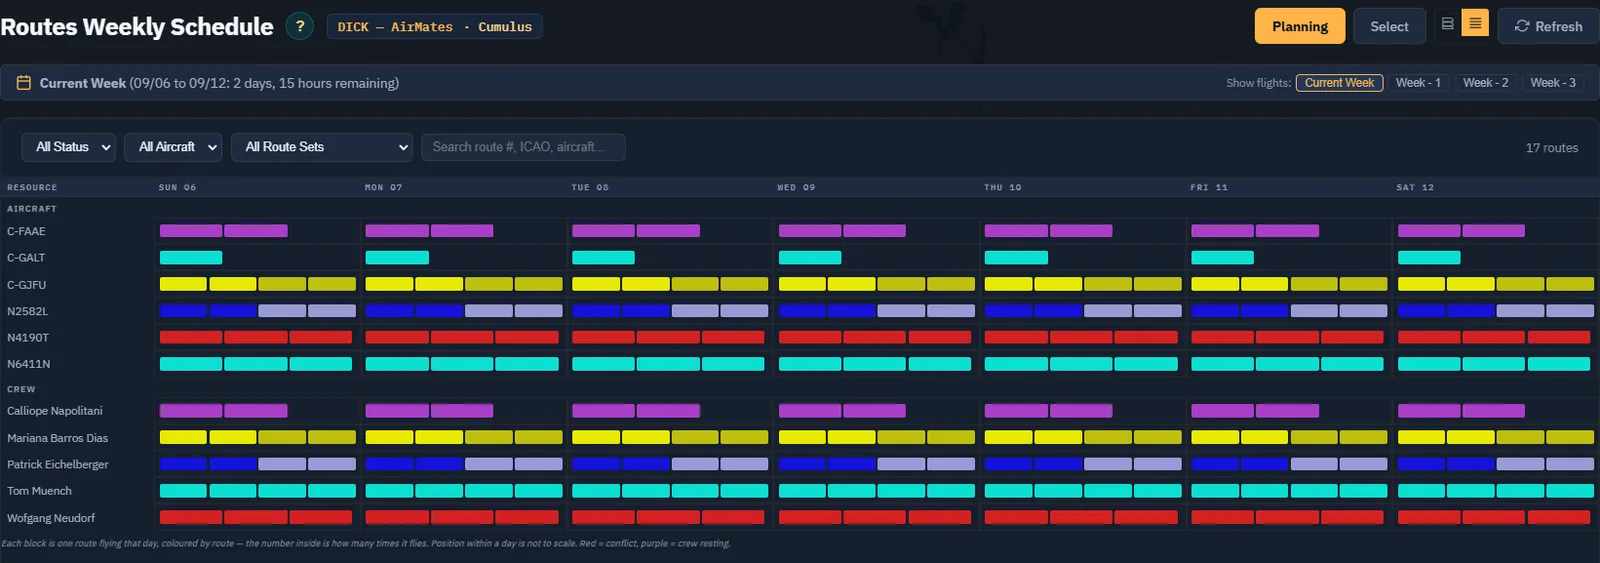
A sensible next exercise is a return service. Plan its departure after the outbound flight, arrival processing and necessary preparation. Make sure both services use an achievable sequence of airports. Do not add every weekday until you can explain how the aircraft returns and how the crew remains available.
If you are only practising setup, use Deactivate Route after inspecting the result. The route remains available for later editing and reactivation. Deactivation also unlocks schedule fields that are locked while active; it is not the same action as deleting the route.

Checkpoint: you have an operational plan for the next departure, or you have left the practice service inactive.
Step 14. The same workflow with an A380
The Cessna exercise teaches the controls at a small scale. It does not define the intended maximum size of a regular-route operation.
A real example found through Routes Leaderboard is SH83 — Shaker, on Cumulus. Its route 627, Frankfurt (EDDF) → Dubai (OMDB), uses an Airbus A380 FBW. The following views were captured in read-only inspection.
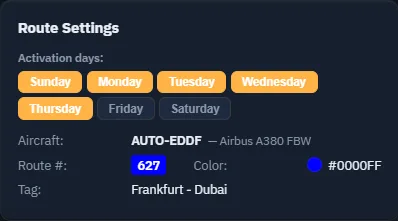

| What to compare | Tutorial Cessna service | Observed A380 service |
|---|---|---|
| Sector | TFFF → TFFR | EDDF → OMDB |
| Offered economy seats | 2 | 430 |
| Offered business seats | 0 | 121 |
| Offered first-class seats | 0 | 60 |
| Total offered seats | 2 | 611 |
| Offered cargo | 0 lbs | 81,476 lbs |
| Assigned crew | Player pilot | Pilot, copilot and 12 attendants |
| Flight mode | Simulator | AI |
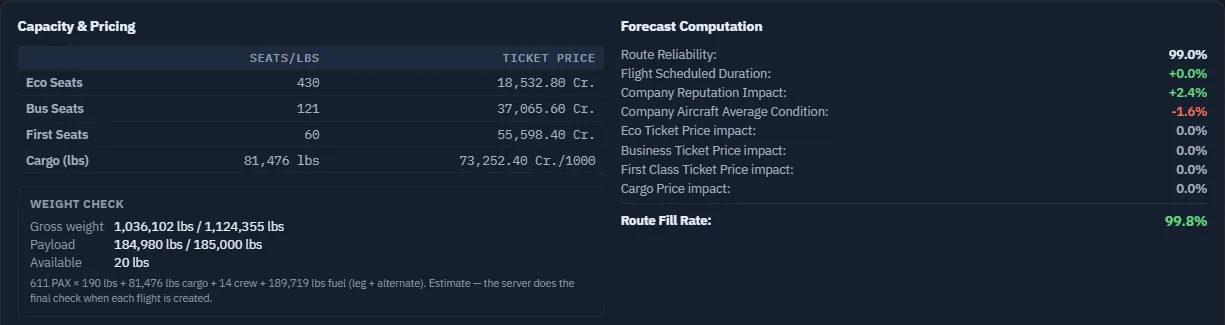
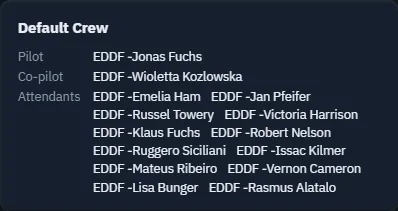
Read the margin as carefully as the seat count: this particular A380 example showed only 20 lbs Available in the estimate. That is a useful illustration of why a large aircraft still needs a weight check, not a margin to copy into your first service.
For your own airliner, reassess airport suitability, range, fuel, cabin configuration, crew, turnaround time and operating costs. Keep the same sequence: define a service, check that it fits, save, activate and monitor its occurrences.
You now know how to…
- Distinguish company regular routes from Freelance schedules and individual occurrences.
- Create a one-day service with an aircraft, pilot and three airports.
- Read UTC times and slots as both day and time commitments.
- Separate offered capacity, estimated weight, forecast demand and operating profit.
- Save, activate and inspect the first dated flight.
- Use journals and weekly planning before expanding.
- Apply the same workflow to larger aircraft without copying unsuitable Cessna settings.
Continue with Capacity, fuel and weight (section 15.2), then Crew duty and rest (section 15.3).
Additional example: saved route identity and slots
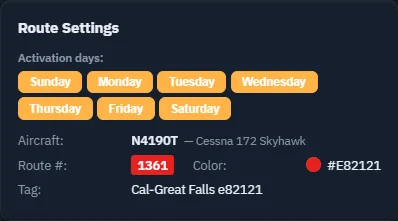
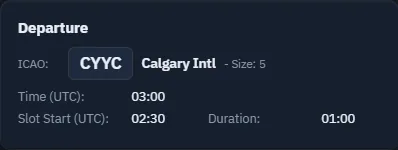
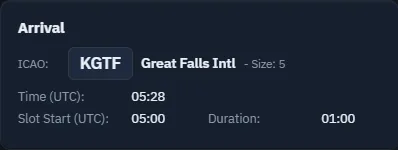
These retained close-ups belong to an earlier Cessna service from Calgary (CYYC) to Great Falls (KGTF). They show how identity and UTC slots are displayed; do not copy their airports or times into the separate tutorial route.
15.2 Capacity, Fuel and Weight on a Regular Route
This section supports Creating Your First Company Regular Route (section 15.1). Use it while choosing the seats and cargo for your service, and when a route saves successfully but its flights do not start.
Read an offer as a capacity limit
Eco Seats, Bus Seats, First Seats and Cargo define what you offer on each occurrence. They are not an instruction to move the cargo already in your company's inventory, and they are not a prediction that every seat will sell.
For the first tutorial service, enter two economy seats and no cargo. Leave the other cabin classes at zero. Inspect the weight estimate before increasing anything.
Each passenger counts as 190 lbs, including luggage, in this calculation. A useful way to read the load is:
Passengers = (economy + business + first-class seats) × 190 lbs
Load       = passengers + offered cargo + required crew
Take-off   = aircraft empty weight + load + estimated fuel
The route estimate accounts for the pilot, any required copilot, and the attendants required for the offered seats. Picking a larger aircraft therefore does not simply turn its maximum payload into saleable cargo: crew and fuel still matter.
The aircraft's cabin configuration matters too. Removing seats can provide extra weight capacity; the calculation accounts for that allowance and the corresponding reduction in empty weight. On a reconfigured aircraft, the displayed Payload can therefore differ from the raw passenger, cargo and crew sum. Read the calculated block rather than comparing that raw sum with an unadjusted aircraft specification.
Resolve the airports before judging the estimate
Select the aircraft, departure, destination and alternate before relying on Weight check. The calculation needs aircraft data and route distance. The alternate matters because the estimate includes fuel for the leg and alternate.
If the aircraft or route information is incomplete, an absent estimate is not a clean bill of health. Finish the inputs and let the page update.
The three main lines answer different questions:
| Line | What to check |
|---|---|
| Gross weight | Estimated take-off weight against the aircraft limit. |
| Payload | The calculated load against the aircraft's payload limit. |
| Available | The remaining margin; a negative number means the offer does not fit the estimate. |
In our tutorial configuration, the screen showed 2,376 / 2,558 lbs gross weight, 570 / 810 lbs payload, and 182 lbs Available. It also showed the ingredients: two passengers, no cargo, one crew member and 115 lbs of estimated fuel.
These are figures from the pictured aircraft and route. They are not fixed values for all Cessna 172 models, and the estimated fuel is not a substitute for your actual dispatch planning.
Learn the overload warning without saving it
To understand the controls, you can try this on your own inactive practice route:
1. Click Edit.
2. Temporarily increase the cargo offer.
3. Observe the change in Weight check.
4. Click Cancel to discard the experiment, then verify the saved cargo offer is unchanged.
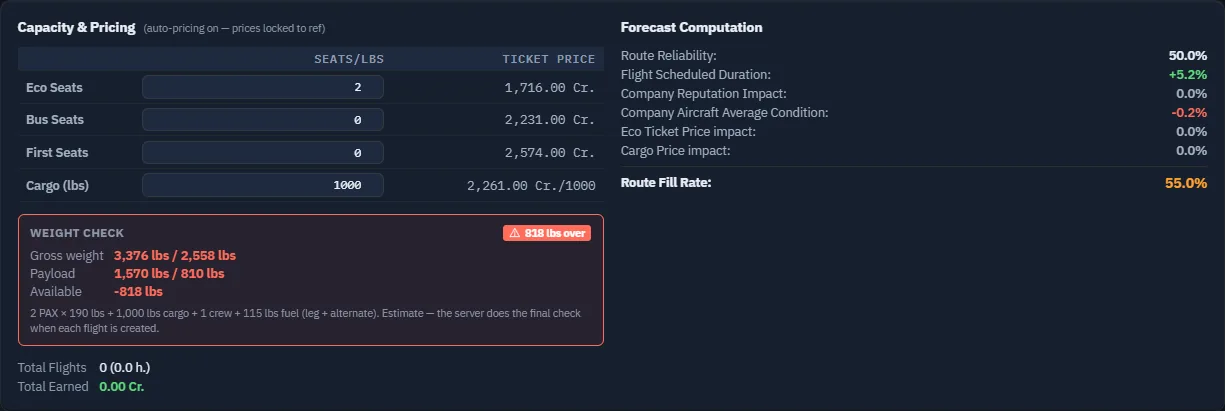
The block turns red and identifies the excess. Start by reducing the offered seats or cargo, or choose a more suitable aircraft. Do not remove necessary flight fuel or select an unsuitable alternate merely to make the displayed number turn green.
For this exercise, return to 2 economy seats and 0 cargo. Check both the input values and the resulting margin.
Keep the forecast and the weight check separate
A high fill-rate forecast cannot make an overloaded aircraft legal. Equally, plenty of weight margin does not mean there is enough demand to fill the service profitably.
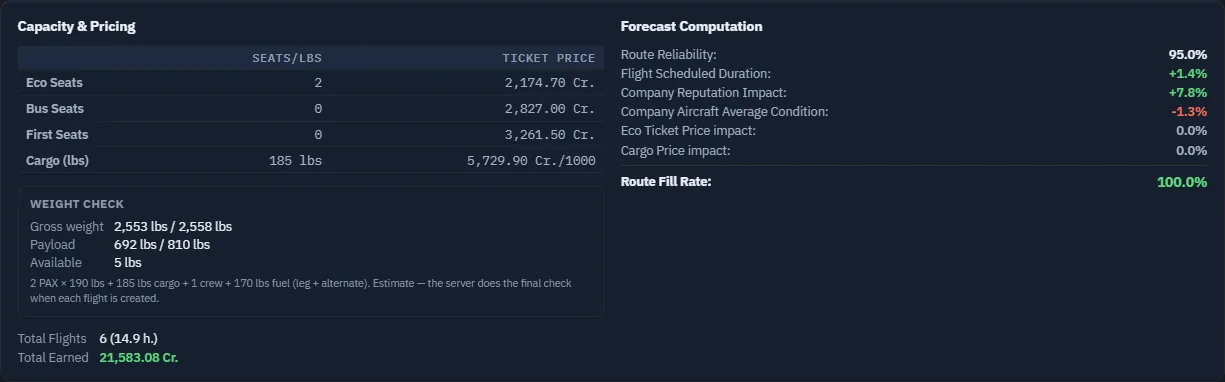
Read the forecast for expected demand and its modifiers. Read the weight block for carrying capacity. Then plan actual fuel and operating costs. Avoid copying a nearly full aircraft just because its forecast looks attractive.
Understand when the final check happens
The route's weight block is an estimate. The server performs the final weight check when each flight is created, using the actual flight state. Saving and activating a route do not prove that every future occurrence can be launched.
This explains an otherwise confusing sequence: a route can be saved, become active, and later have an occurrence refused on weight. An aircraft with different fuel on board, a changed configuration or a different assigned aircraft can change the result.
When an occurrence fails:
1. Open the route's Scheduled Flights.
2. Read the latest comment and open the occurrence journal.
3. If it reports weight limits, compare the listed fuel, crew, passengers, cargo and empty weight with the limits.
4. Correct the service or aircraft configuration before expecting the next occurrence to work.
Repeated failed occurrences can damage reliability and therefore the service's future demand. Investigate the first repeated error instead of waiting for a busy-looking route to recover by itself.
Apply the same reasoning to a larger aircraft
The scale changes; the questions remain the same. Do the passengers, freight, crew and fuel fit? Can the departure, destination and alternate accept the aircraft? Is the remaining margin useful for the actual operation?
The Cessna is an accessible tutorial aircraft with limited range and carrying capacity. Regular routes also support larger regional and airline operations. Recalculate the offer for the aircraft and service you actually intend to fly.
You now know how to…
- Separate offered capacity from forecast demand.
- Read the passenger, crew and fuel contributions to the estimate.
- Recognise an overload and undo a practice edit without changing the saved route.
- Understand why activation is not the final flight weight check.
- Use an occurrence journal to investigate a refusal.
Return to the route walkthrough (section 15.1) · Continue to crew duty and rest (section 15.3)
15.3 Crew Duty and Rest on a Regular Route
This section supports Creating Your First Company Regular Route (section 15.1). Read it before replacing the tutorial's player pilot with AI crew, or scheduling several flights with the same employees.
Start with the right distinction: you and your employees
Our Cessna exercise uses the company's player pilot. Your own avatar is exempt from automatic employee rest and the duty penalty. That is why the tutorial can teach route creation without first setting up an employee roster.
AI employees are different. With the company's employee duty-and-sleep system enabled, their duty windows and rest can affect a route even if you are flying the aircraft yourself. An AI copilot or attendant is still an employee; selecting your avatar as captain does not exempt the other crew members.
Understand the two durations
The documented duty system uses a 14-hour duty window and 8 hours of rest.
The duty window starts with the employee's first flight after rest. It is not a fixed roster such as “works 08:00–16:00”. Time between flights still advances an already-open window, so a long wait on the ground can matter even when the pilot has flown very little.
For example, if an employee starts a fresh duty period at 06:00 UTC, the 14-hour window ends at 20:00 UTC. A new flight late in that window must be considered alongside its expected completion time, not merely its departure time.
Read what the crew card tells you
Before operating the route:
1. Open Regular Route Settings.
2. Read the Default Crew card.
3. If an employee is resting, note the displayed rest-end time.
4. Compare that availability with the flights you expect the employee to operate.
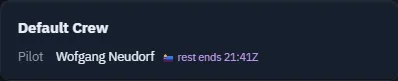
The card can display either a rest-end time or a duty-end time with time remaining. A missing timer does not always mean unlimited availability: the employee may have no open duty window, the roster data may not be available, or the duty system may be disabled. Read their status as well.
A route may be activated while an employee is resting. Activation validates the service configuration; the later flight still needs an available crew. Read any rest information shown near activation rather than treating a successful activation as proof that the employee can depart now.
Separate real time from simulator time
Employee duty and rest advance with real elapsed time. Changing the simulator's clock to match a published schedule does not reset the employee's duty window.
For simulator-operated route flights, a schedule-time option can align the simulator with the scheduled departure. This does not make the two clocks interchangeable, and it does not remove the slot's weekday requirement.
For AI-operated flights, the scheduled departure controls when the service is due to operate. The instruction that a simulator occurrence can be flown within the schedule week must not be read as permission to make an AI route depart whenever you want.
A practical planning habit is to ask two separate questions: “Which occurrence and slot am I flying?” and “Are the assigned employees available now, for the expected duration?”
Know what happens at the end of a duty window
An employee is not sent to sleep in mid-flight. Automatic rest is applied when the employee is in an eligible ground status such as Idle or Ready.
A flight that ends beyond the duty window can incur a 2,000 Cr. penalty for each affected AI crew member. That penalty does not itself interrupt the flight. Resting, on the other hand, makes an employee unavailable for departure.
The automatic rest calculation can count from the end of the duty window rather than adding eight fresh hours after touchdown. Do not calculate a new wake-up time by simply adding eight hours to every landing; read the employee's actual rest-end indication.
The tutorial did not deliberately fly an exhausted crew to reproduce the penalty. These rules describe the documented duty mechanism; the screenshot demonstrates the rest indication itself.
Check the whole rotation
1. Return to Routes and select Planning.
2. Locate the aircraft and each crew member you are reusing.
3. Inspect the sequence of services and any conflict or rest indications.
4. Leave time for the aircraft to arrive, prepare for the next departure, and bring the crew to the correct airport.
Do not rely on the grid alone to prove availability. It is a planning aid based on the current fleet and roster; the server has the final say when a flight is created.
If two assignments cannot both be operated, revise the timetable or use another suitable crew. Repeatedly activating a route does not solve an overlap or a crew member being at the wrong airport.
After changing an assignment, inspect the affected routes again. Check the aircraft and every required employee across the whole rotation, including the positioning needed before the next departure.
Scale the crew with the aircraft
Larger regular routes use the same controls, but introduce more people whose qualifications, location and availability need to fit the timetable. Determine cabin-crew needs from the offered seats and the application requirements, rather than copying the crew count from another company's screenshot.
The employee duty-and-sleep system is controlled by a company setting in Settings → Preferences, subject to the rules allowed by your world. If it is disabled for the company, the duty mechanism and its indicators do not apply. You do not need to change that setting to follow the player-pilot tutorial.
You now know how to…
- Distinguish your avatar's exemption from employee duty rules.
- Explain when an employee's duty window starts.
- Read a rest-end indication before relying on a scheduled departure.
- Keep the simulator schedule and real employee availability separate.
- Plan an aircraft and its full crew as shared resources.
Return to the route walkthrough (section 15.1) · Review capacity and weight (section 15.2)