
Fly a Freelance Scheduled Route
A Freelance schedule gives you a sequence of airline flights to fly yourself. You select an airline and a suitable simulator aircraft, inspect a proposal, accept the programme and prepare its current leg. You do not create or manage that airline's company regular routes.
Before you start
Complete your first charter first. You should know how to connect your simulator, prepare dispatch and register a flight. Have the aircraft add-on you intend to fly available in the simulator. A matching aircraft in a selector is not proof that the add-on is installed or connected.
For this exercise we use Sounds Air and a Pilatus PC-12, with two proposed flights around NZWB and NZPP. This is a short learning programme, not a promise that today's catalogue will always contain the same flights. Choose a currently available equivalent if necessary. The Cessna used later for creating company regular routes serves a different exercise.
Step 1. Open the Freelance route browser
1. Open Freelance Job and find its Regular Routes card.
2. If you already have an active programme, inspect it first with Show legs. Only one Freelance route schedule can be active at a time.
3. Otherwise open the route browser. Its title is Apply for a route as a Freelance.
4. Check the company badge before accepting anything.
A charter and a route schedule are separate activities. In the captured company, a pending Cessna charter remained present while the PC-12 route programme was accepted. Do not abandon unrelated work to follow this tutorial.
Step 2. Find an airline and choose your aircraft
1. Type an airline name in Text Filter, for example Sounds Air.
2. Select the matching airline in the list.
3. Under Aircraft Type, select the aircraft you intend to use in your simulator. We selected Pilatus PC-12.
4. Inspect the map and the available Starting Airport choices.
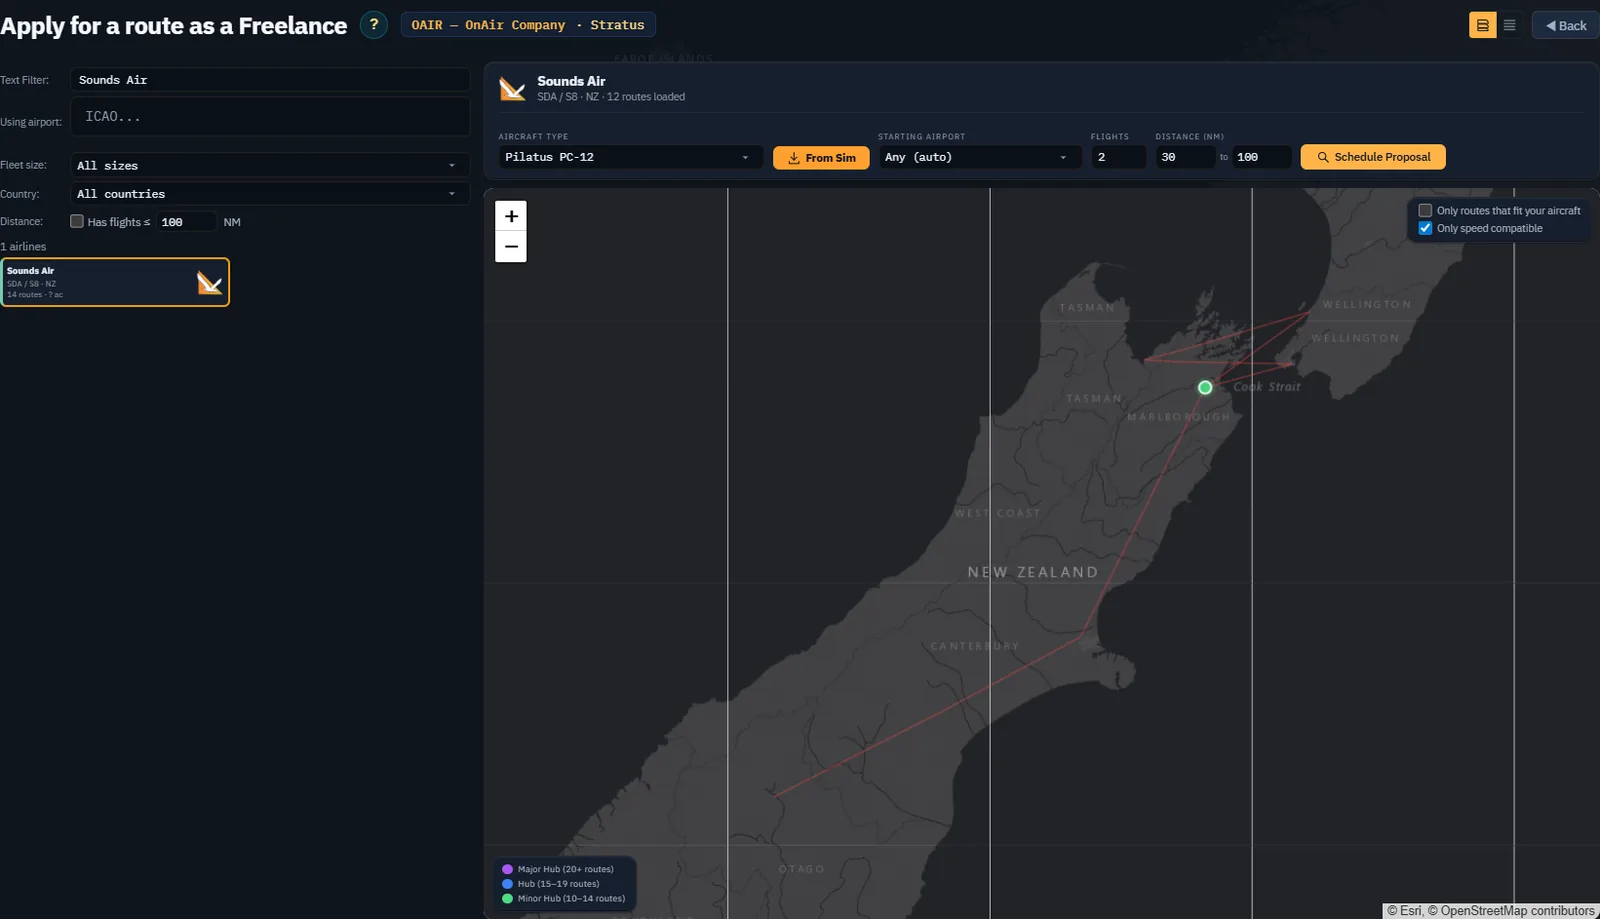
The airline's catalogue count and the number of routes loaded for the current view can differ. Work from the routes and airports actually offered by the current selection. From Sim can assist with aircraft detection when the simulator is connected; otherwise choose deliberately and verify the match before tracking.
Step 3. Request a small proposal
1. Start with 2 flights.
2. Choose a short distance interval suited to your available flying time. Our proposal used 30–100 NM.
3. Review Only routes that fit your aircraft and Only speed compatible. A short geographical distance does not automatically mean the timetable is easy for your aircraft.
4. Choose a starting airport, or leave Any (auto) if you want the generator to choose from the available network.
5. Click Schedule Proposal.
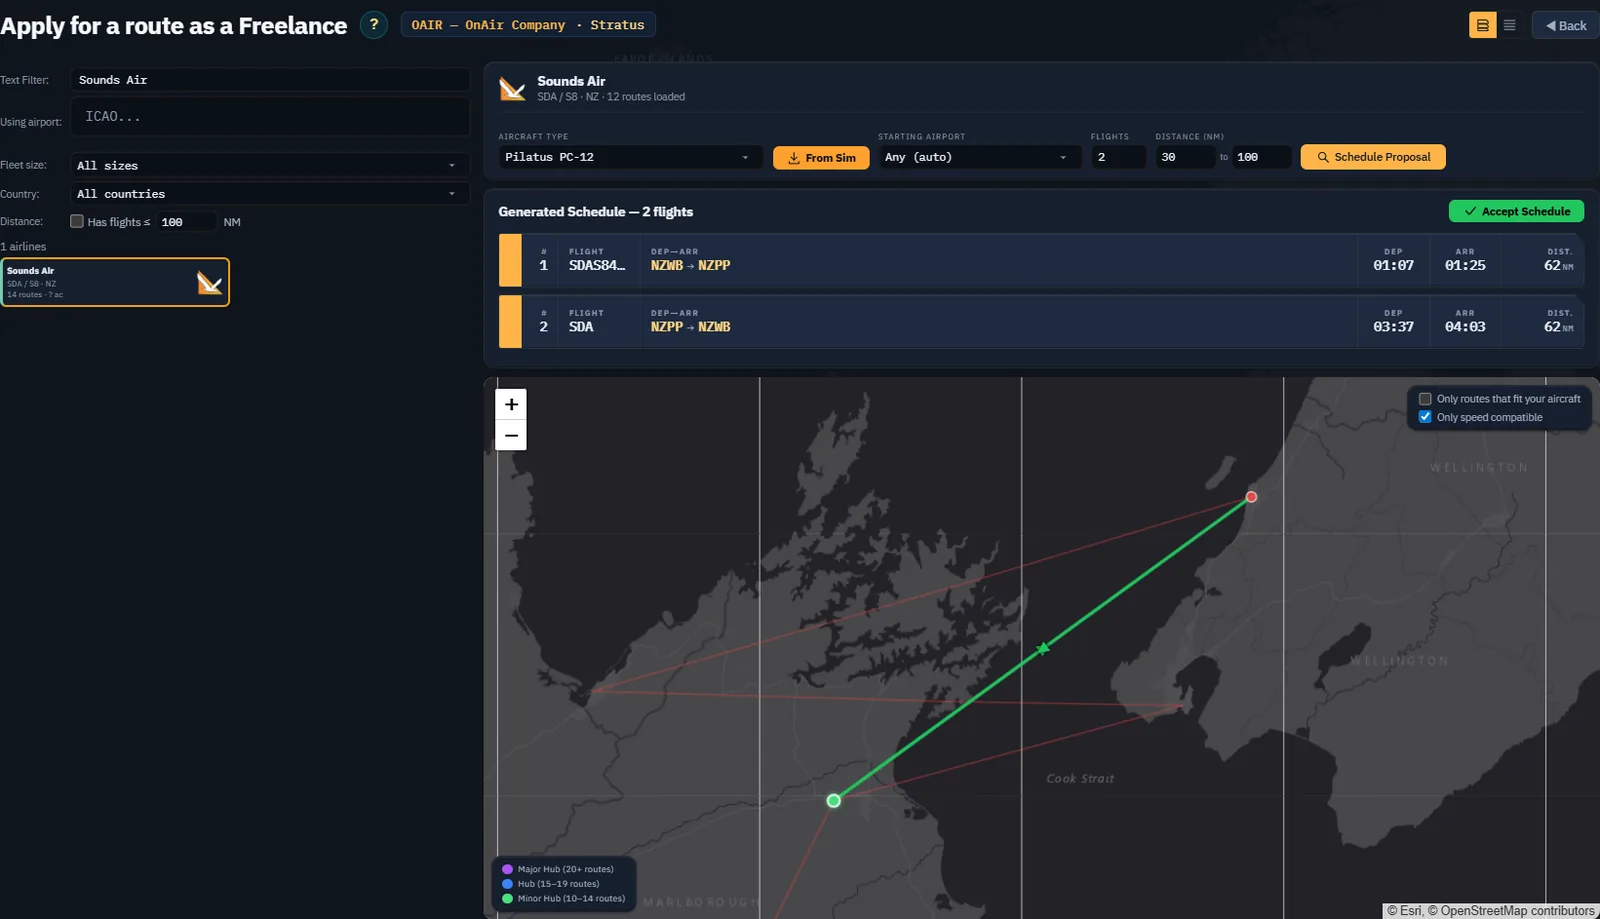
A proposal is not yet your accepted programme. If no suitable proposal appears, reconsider the airline, airport, flight count or distance filters. Do not loosen a restriction without checking why the original combination failed.
Checkpoint: you can identify the first departure airport, the aircraft and the time needed to complete at least the first flight.
Step 4. Accept and inspect the actual programme
1. Click Accept Schedule when satisfied with the proposal.
2. Wait for the Freelance hub to show the programme under Regular Routes.
3. Open Show legs.
4. Read each leg's status, UTC times, payment and the Weekly Bonus Limit shown above the list.
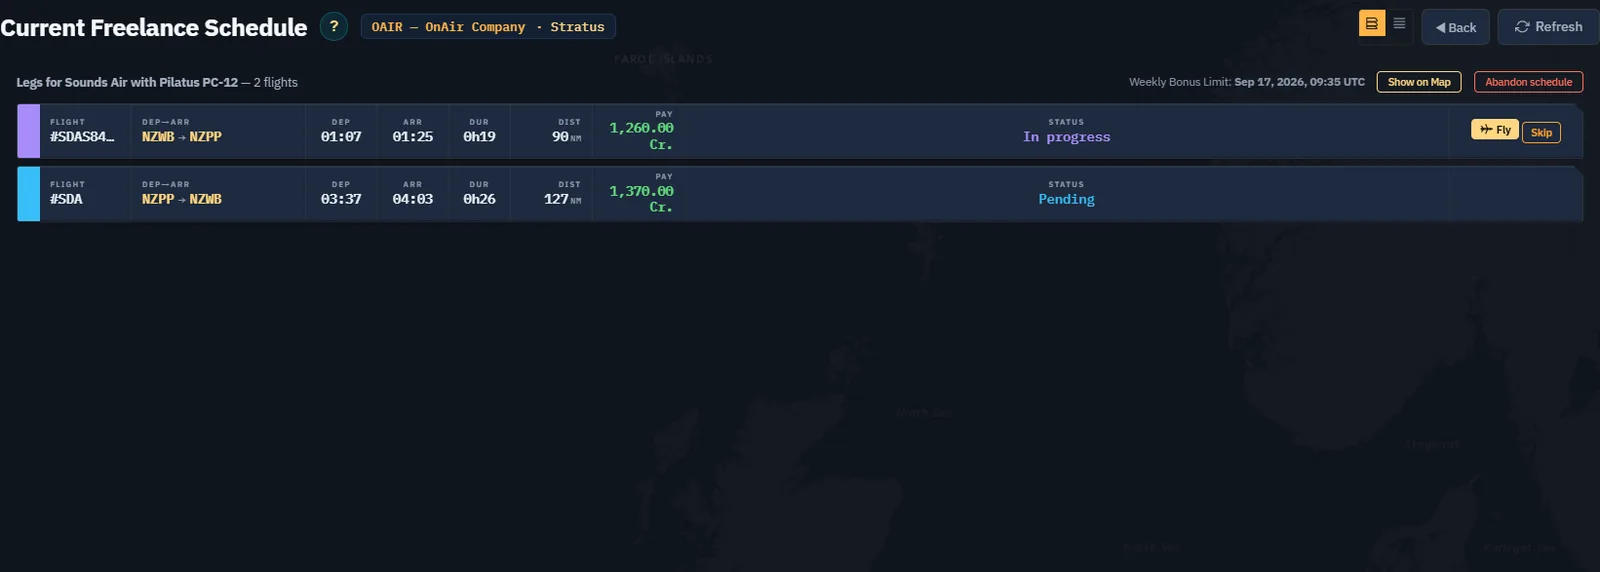
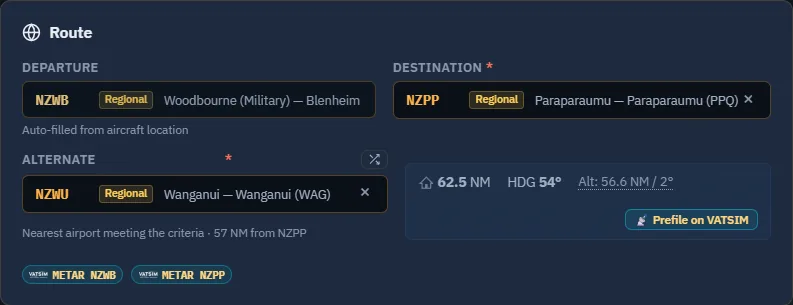
Re-read the accepted result rather than treating the preview as the final contract. In this capture, the proposal and accepted schedule showed different distance figures; dispatch subsequently showed the geographical sector as about 62 NM. The tutorial therefore does not treat any one preview distance as a fuel calculation. Use the actual dispatch route and an appropriate operational flight plan.
The current leg can be labelled In progress in the schedule while the aircraft is still awaiting dispatch. That label alone does not prove a flight is being tracked in the simulator.
Step 5. Open dispatch for the current leg
1. Use Fly on the current schedule leg, or Fly Now on its hub card.
2. Verify the supplied aircraft and its departure location.
3. Verify the destination and a suitable alternate.
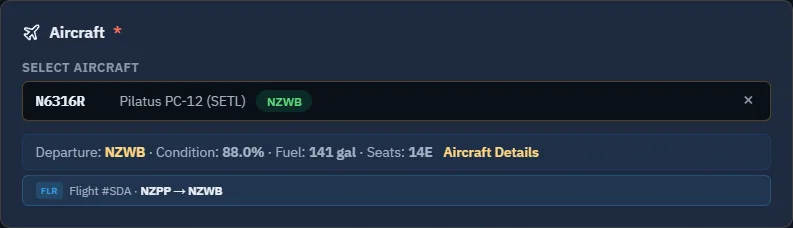
4. Inspect the selected passengers and cargo. They define the contracted load.
5. Read the crew and fuel information supplied by the employer.
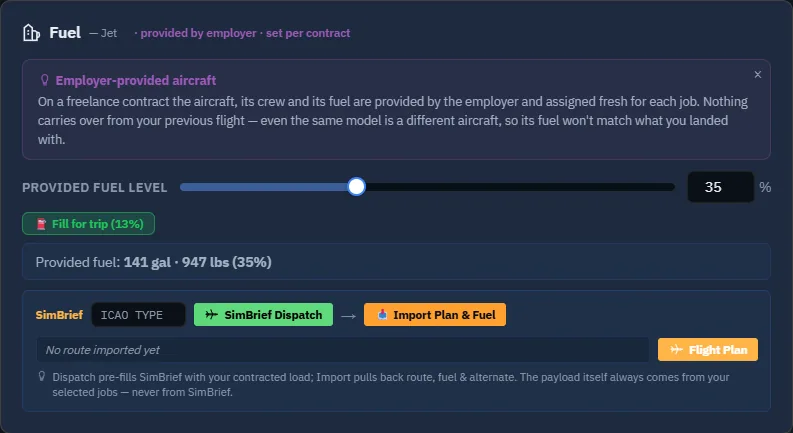
6. Review weights and fuel together, including the alternate and reserve appropriate to your flight. Importing a plan must not be mistaken for changing the contracted passenger or cargo load.
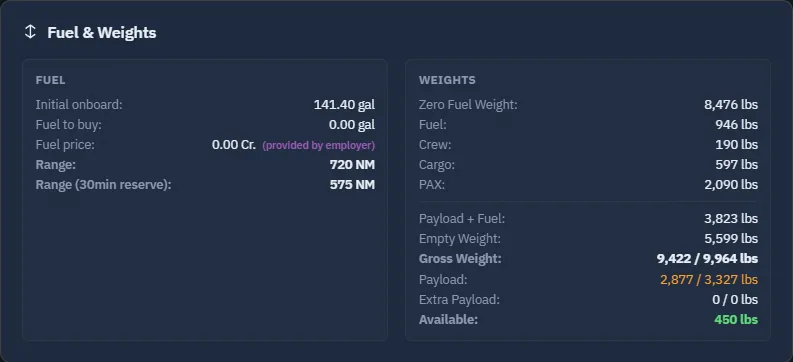
Checkpoint: aircraft, departure, destination, alternate, selected jobs, fuel and weight agree with the flight you intend to fly.
Step 6. Fly the leg in your simulator
Freelance jobs require a human-flown simulator flight. Dispatch explicitly disables AI launch for this load. Read the Use official Route Schedule option and the displayed simulator-time explanation before proceeding; do not assume local computer time and published UTC departure are interchangeable.
Follow the previously learned dispatch and tracking sequence with the simulator loaded at the correct airport in the correct aircraft. Resolve the actual connection and tracking conditions, then use Fly in Simulator when ready.
CAPTURE TO COMPLETE — simulator required, FR-08. Load the accepted aircraft at the first departure airport, finish dispatch and start a real tracked flight. Capture the tracking Overview with the route and connection state visible, then a representative en-route view. Include the simulator-time choice in a separate capture before starting. Do not substitute a schedule status badge for evidence of tracking. This flight was not performed during manuscript preparation.
Step 7. Register and verify the result
Complete the flight, follow the landing and registration procedure, then return to the programme. Check the flight result, payment and progression shown by the server. A completed flight and a schedule bonus are different results: read any timing or eligibility explanation before attributing a bonus to the landing alone.
CAPTURE TO COMPLETE — completed flight required, FR-09. After a genuine landing and registration, capture the debrief and the updated Current Freelance Schedule. Show the completed first leg and the next available leg. If a bonus is lost or a timing warning appears, capture its actual explanation and document that observed outcome rather than inventing a successful result.
Step 8. Continue or review a blocked leg
Return to Show legs to identify the next action. Resume is for an already active flight; Fly prepares an available leg. Read disabled-button tooltips when the aircraft is busy, in warp or unavailable. Refresh the programme if its state has not yet caught up with the operation you just completed.
Skip discards a leg; Abandon schedule discards the remaining programme. They are not refresh buttons and are not required to inspect the schedule. For this writing exercise the accepted programme was retained, ready for the real flight captures.
You now know how to continue
- Generate and inspect a short Freelance programme.
- Distinguish a proposal, an accepted schedule and a tracked flight.
- Prepare the supplied aircraft and contracted load.
- Identify the real-flight evidence still needed to finish the exercise.
Continue with the Freelance daily routine, then choose whether to remain a Freelance pilot or begin company management.