
Set Up OnAir and Companion
Before you can fly a single mile, you need a running OnAir Companion on your PC. This chapter walks you through downloading the installer, getting past Windows SmartScreen, logging in with your OnAir account, picking the company you'll fly for in the Lobby, and understanding what happens when an update is waiting for you at launch.
1.1 Install & launch the Companion
Download the Companion
The OnAir Companion is a desktop application for Windows. It runs alongside your flight simulator (or on its own, in Tycoon mode) and is the only tool you need to fly missions, run a company, and progress in OnAir.
Head to the official OnAir website and grab the latest installer from the Download section. The file is a single signed .exe (NSIS installer) named along the lines of OnAir-Companion-Setup-x.y.z.exe.
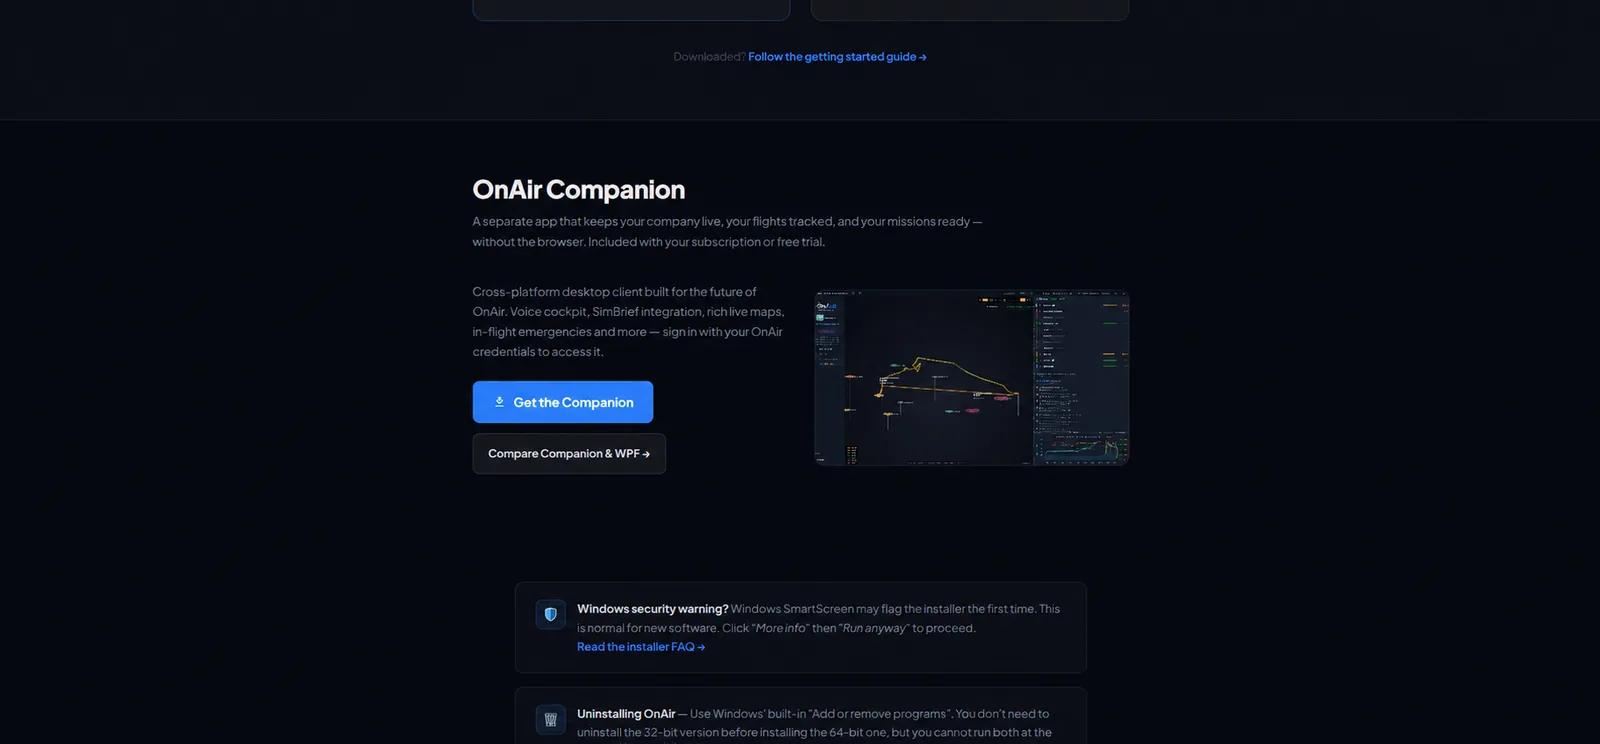
Note — There is no separate "freelance" or "career" download. The same Companion handles both modes; you pick your mode later, when you create a company in the Lobby.
Install (Windows SmartScreen)
Double-click the installer you just downloaded. Depending on your Windows configuration and the installer's reputation, you may see one or both of these prompts. If neither appears, continue with the installer:
- A User Account Control prompt asking for elevation — click Yes.
- A blue Windows protected your PC SmartScreen banner. This warning is not shown on every installation.
If the SmartScreen banner appears:
- Click More info.
- Confirm that the publisher is OnAir Company — this proves the file is the real one.
- Click Run anyway.
Warning — If SmartScreen does not show a publisher line, or shows a different publisher, stop and re-download from the official site. Don't run anything that can't prove who signed it.
The installer is a standard NSIS wizard: pick the install folder (the default is fine), wait a few seconds, and let it create a desktop shortcut.
Log in to OnAir
Launch the Companion. The first thing you'll see is a loading splash, followed by the Login screen.
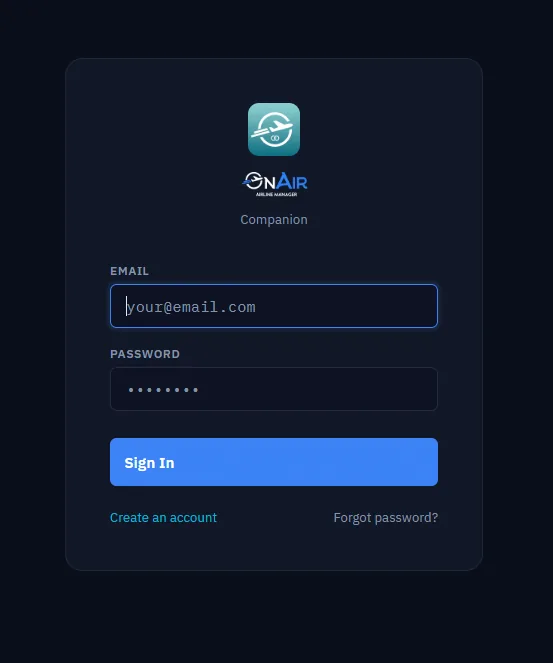
Type in the email and password you used when you registered on the OnAir website. If you don't have an account yet, click Register on the OnAir site first — the Companion does not create accounts, it only signs you in.
What happens behind the scenes once you click Login:
- The Companion checks that the OnAir servers are up. If a maintenance window is active, you'll see a friendly maintenance splash with a Recheck button instead of being thrown into a confusing error.
- Two large reference databases — the airport database and the cargo/charter database — start downloading in parallel with your login. You'll see a progress bar for the airport DB and an indeterminate bar for cargo/charter.
- Once both databases report ready and your login succeeds, you move on to the Lobby.
Note — The very first launch is the slowest, because both reference databases are downloaded from scratch (a few hundred megabytes, depending on coverage). Subsequent launches are nearly instant — only the deltas are fetched.
If your credentials are saved from a previous session, the Companion logs you in automatically and skips the form entirely — you'll go straight to the loading splash and then to the Lobby.
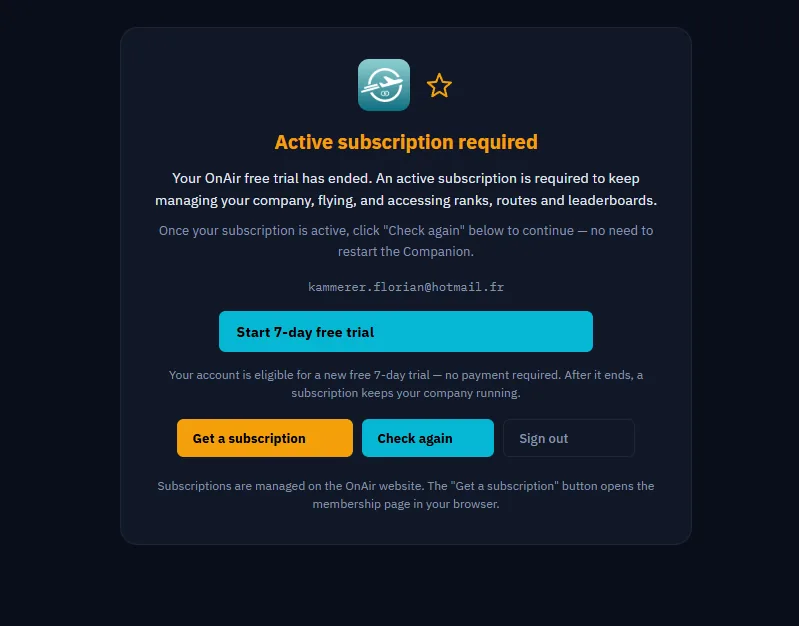
If the Active subscription required screen appears, read the available trial or subscription options. After updating access, use Check again.
The Lobby — choose a company
After login, you land in the Lobby.
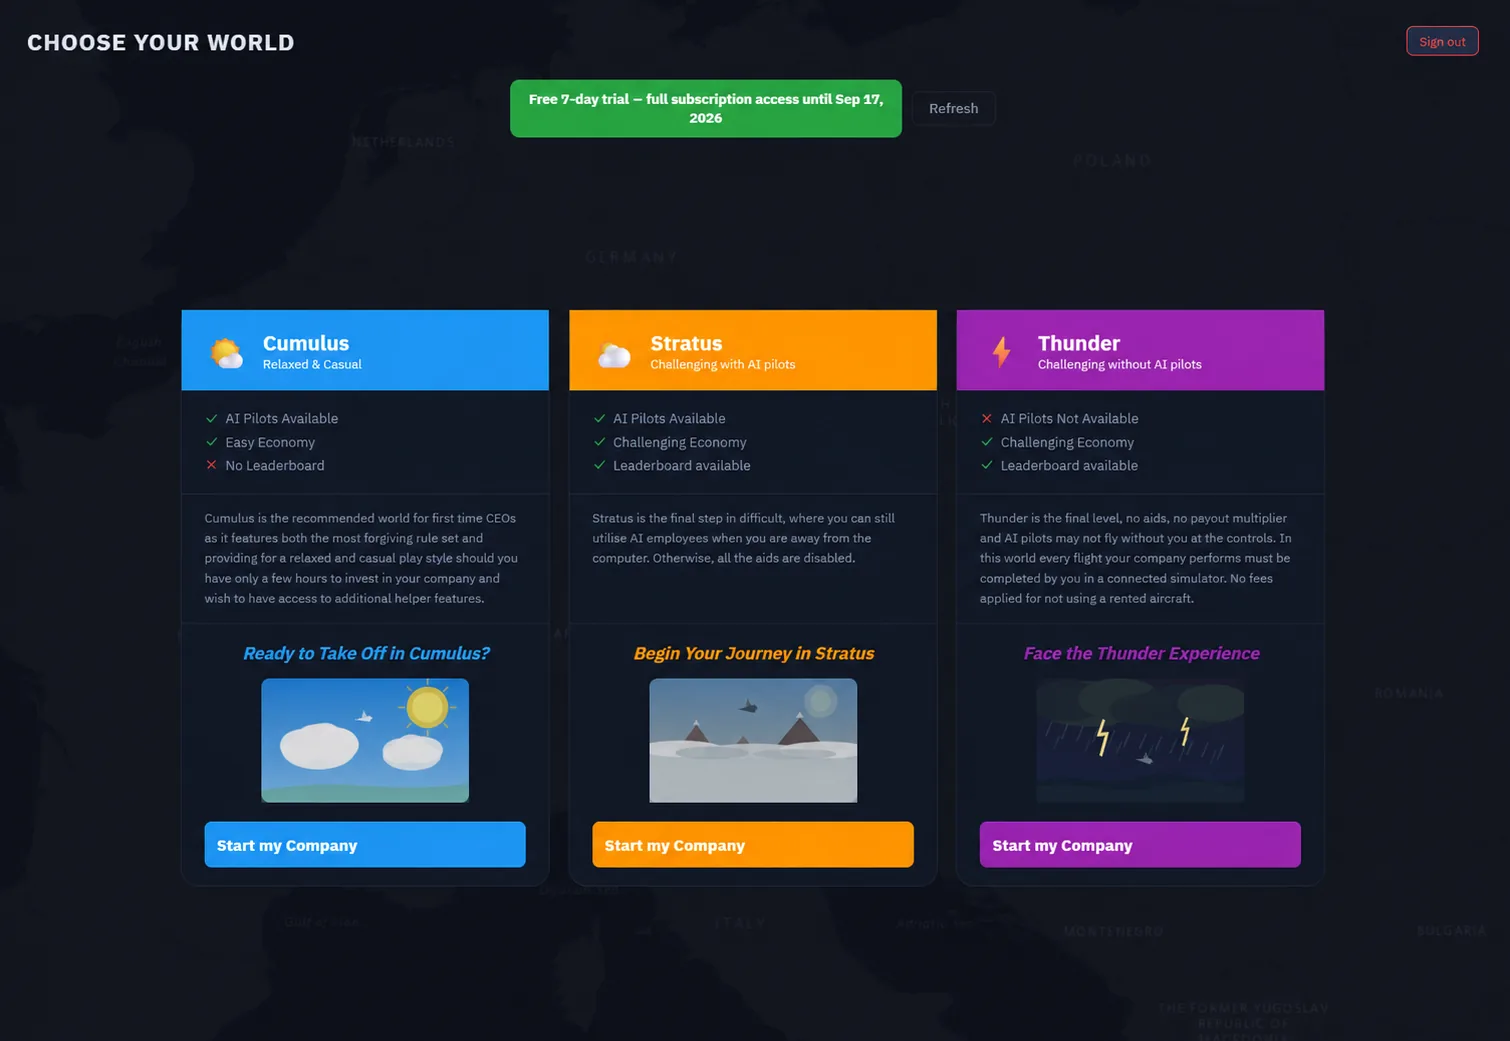
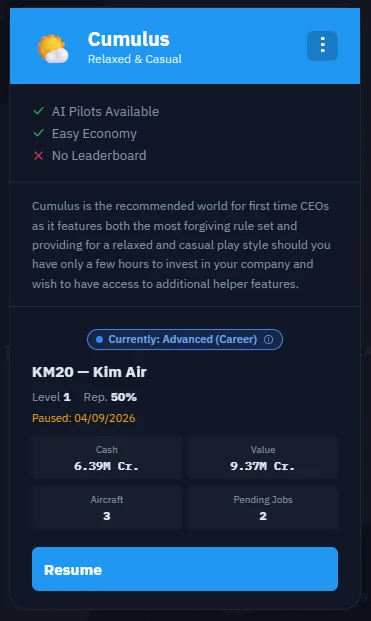
The Lobby is where you decide which company you fly today. It is laid out around three things:
- World tabs across the top. OnAir runs several independent worlds — separate economies, separate fleets, separate companies. Each world has its own tab. This creation flow permits one personal company per world; it checks for an existing company before creating another. Pick the tab for the world you want to play in.
- Your company cards. Each card represents one of your companies in that world: company name, current cash, last activity, and a big button. If the company is paused (you stopped playing a while back), the button reads Resume; tapping it opens a confirmation dialog before re-activating the company. If it's the active one, the button is just Resume with no confirmation.
- The news carousel. Up to five rotating announcements from the OnAir team — patch news, events, server status. Worth a quick read before you dive in.
Create your first company
If you've just registered and have no company yet, the tab shows an empty grid with a Create Company card. Click it.
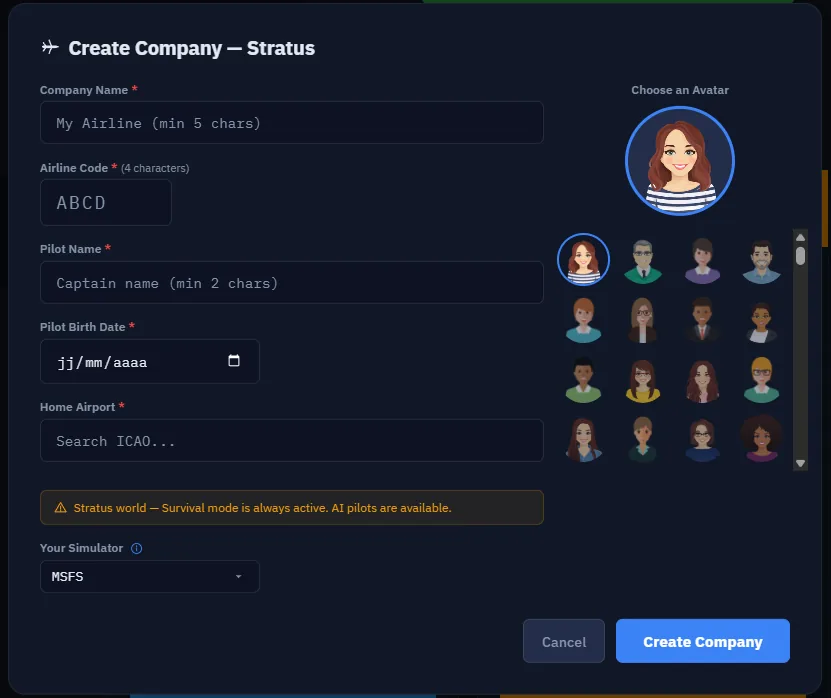
You'll be asked for company and pilot details, a home location and simulation settings:
- Company name and airline code, with an availability check for the code.
- Pilot identity and avatar, and a home airport.
- Simulation and world settings offered by that world. Survival worlds constrain difficulty; Thunder does not permit AI flights.
There is no Freelance/Advanced selector in this creation form. The separate Career transition is described in the final section of this chapter.
Confirm, and the Companion creates the company on the server. A few seconds later, the Lobby refreshes and your new company card is sitting there, ready to Resume.
Note — Once you click Resume, the Companion loads the company's full state (fleet, jobs, mailbox, finances) and drops you on the Dashboard — the topic of §1.3.
Auto-update at launch
The Companion checks for a new version every time it starts, and then every four hours while it's running. If a newer build is available on your channel, the download starts in the background and a small banner appears in the app.
The banner walks through three states:
- Update available — A newer version was found. The download starts immediately and the banner shows a percentage.
- Download complete — The new installer is ready. Click Restart to update to apply it now, or just keep flying — the update will install automatically when you next quit the Companion.
- What's new — On the next launch after an update, a one-time What's New modal shows you the release notes. You only see it once per version.
Note — Most players are on the public auto-update channel. A small group of testers run on the staff channel, which gets builds a few days earlier. You stay on the public channel unless OnAir staff explicitly moves you over.
Warning — Don't kill the Companion while a download is mid-way: you'll just lose the progress and have to start over on next launch. Let the bar finish.
You now know how to…
- Download the OnAir Companion from the official site.
- Get past Windows SmartScreen safely, by checking the publisher before clicking Run anyway.
- Log in with your OnAir account and let the airport / cargo databases finish loading on the first run.
- Navigate the Lobby — world tabs, company cards, news carousel — and either Resume an existing company or Create a fresh one in Freelance mode.
- Recognize the auto-update banner and decide when to restart.
You're now staring at the Dashboard of a freshly created freelance company. Before you go hunting for your first job, the very next thing to set up is the link between the Companion and your flight simulator.
1.2 Connect your simulator
The Companion isn't worth much until it can "see" your simulator. This connection is what enables real-time tracking, fuel and weather autoset, automatic detection of the loaded aircraft and addon, and the final flight registration.
This is Step 1 of the welcome banner. Once the SIM pill is green, the step turns green on its own and you can move on to finding your first job.
The SIM pill — your status at a glance
At the top-right of every Companion screen, just left of the VATSIM LIVE chip, a SIM pill shows the state of the connection to the simulator at all times. It has four states:
| Color | Label example | Meaning |
|---|---|---|
| Neutral | Sim not connected | No connection attempted yet, or you manually disconnected. |
| Orange | Connecting… | The Companion is handshaking with the bridge. |
| Red | Sim not detected | The last connect attempt failed — hover the pill for the exact reason. |
| Green | Cruise · A320neo V2 | Connection established — the pill shows the current flight phase and aircraft name. |
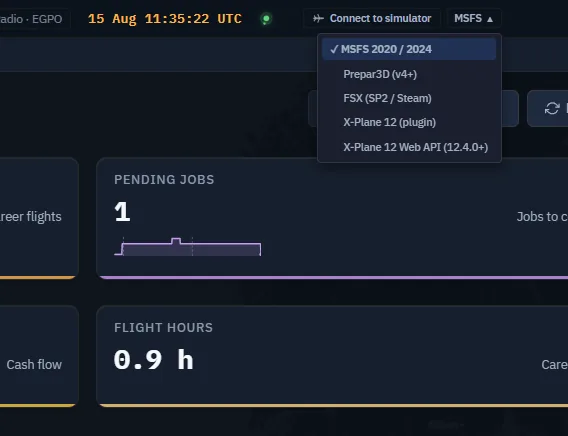
A small chevron sits next to the pill: when the connection is green it opens a live SimConnect debug panel, and an adjacent dropdown lets you swap the active simulator (MSFS, MSFS 2024, P3D, FSX, X-Plane plugin, X-Plane Web API) without going into Settings.

Click the pill at any time — it's the fastest shortcut to retry a connection. If your sim just finished loading, a single click flips the pill green. Click it again to disconnect manually.
Choose your simulator
If this is your first launch, open Settings → Flight Sim from the Settings button at the bottom of the sidebar. The Companion offers five simulators in the Your simulator picker:
- MSFS 2020 / 2024 — one entry covers both releases; the Companion works
out which one is running on its own, so there is nothing to pick between them.
- Prepar3D (v4+) — v4 and later.
- FSX (SP2 / Steam) — FSX-SE or the boxed release with SP2.
- X-Plane 12 (plugin) — the Companion's classic plugin (works for X-Plane 11 too).
- X-Plane 12 Web API (12.4.0+) — the modern HTTP-based link introduced with X-Plane 12.4.0.
If you'd rather not fly through a simulator at all, see Without a simulator (Tycoon mode) below.
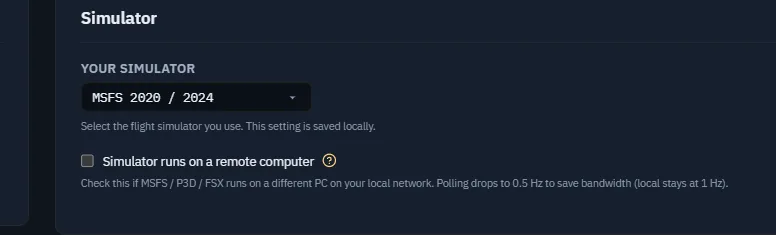
The picker writes your choice live — there's no Save button to chase. The titlebar dropdown stays in sync with whatever you pick here, and the other way around.
Auto-realign on connect — When the Companion connects to a sim, it reads the running application name and quietly realigns the picker if it doesn't match what you had selected. So if you had MSFS 2020 selected but launched X-Plane and clicked the SIM pill, the picker will switch to X-Plane and remember it.
Microsoft Flight Simulator (MSFS 2020 / MSFS 2024)
MSFS embeds SimConnect by default, so there's nothing to install on the same machine.
On the same machine as the Companion
- Launch MSFS (or MSFS 2024).
- Wait until you reach at least the main menu — ideally, load an aircraft on a parking spot.
- Click the SIM pill in the Companion.
- The pill turns green within a few seconds.
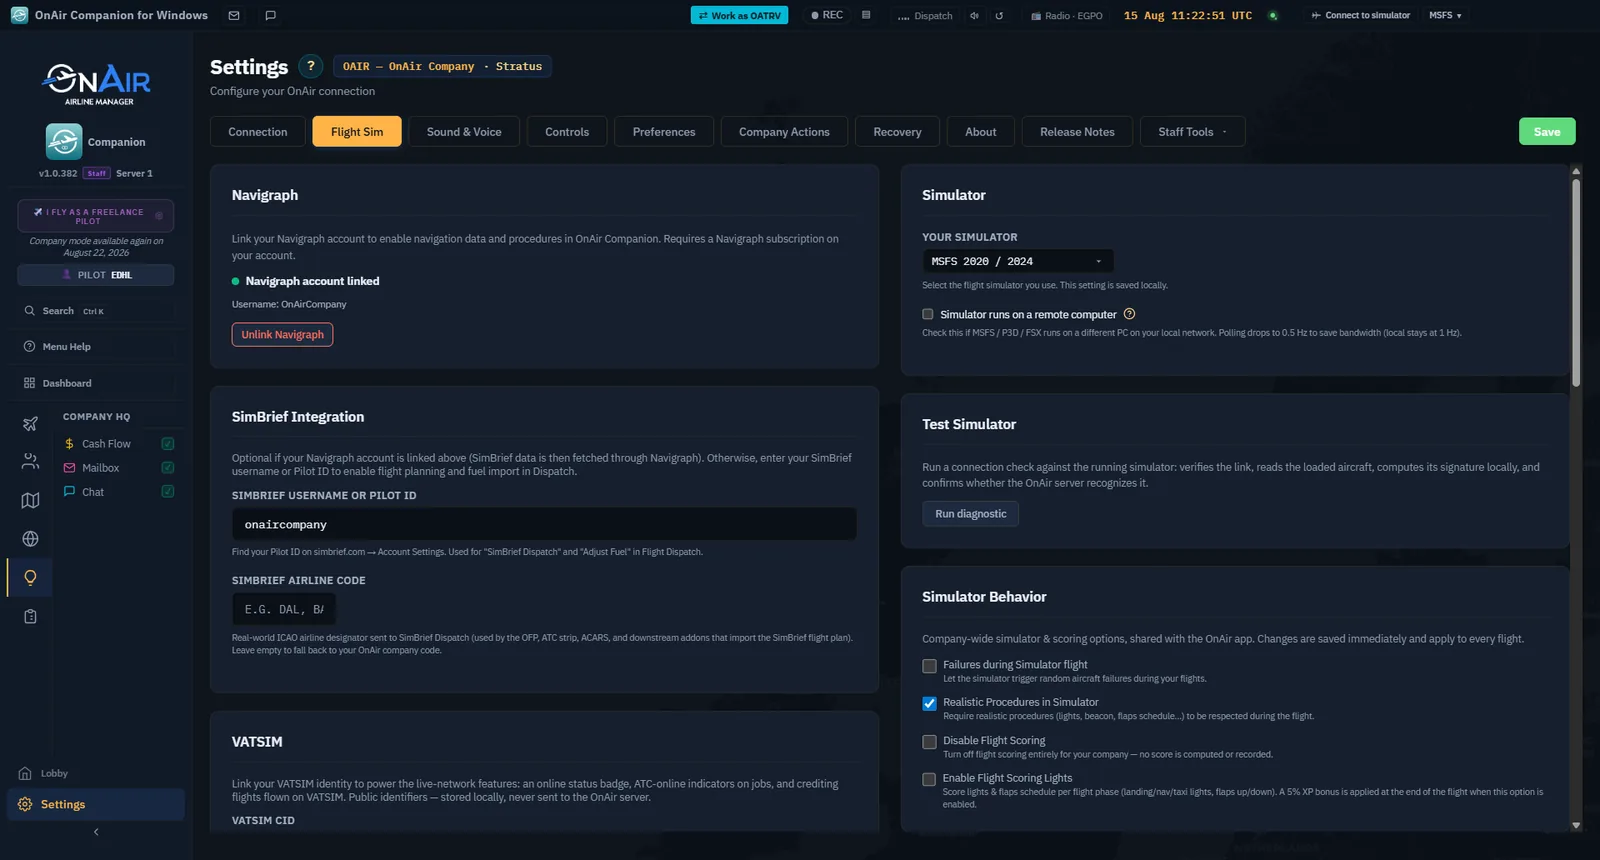
On another PC on the network (remote SimConnect)
If MSFS runs on a dedicated PC and the Companion lives on another machine:
- In Settings → Flight Sim, tick Simulator runs on a remote computer.
- Click Generate SimConnect.xml: a helper modal produces the config file required by MSFS.
- Copy this file to the simulation PC, in the folder the helper points to (typically
%APPDATA%\Microsoft Flight Simulator\for MSFS 2020 or%APPDATA%\Microsoft Flight Simulator 2024\for MSFS 2024). - Open the TCP port (default
500) in the Windows firewall on the simulation PC. - Restart MSFS so it picks up the new
SimConnect.xml. - Back in the Companion, enter the Host / IP of the simulation PC and the matching Port.
- Click Test connection: a green message validates the link.
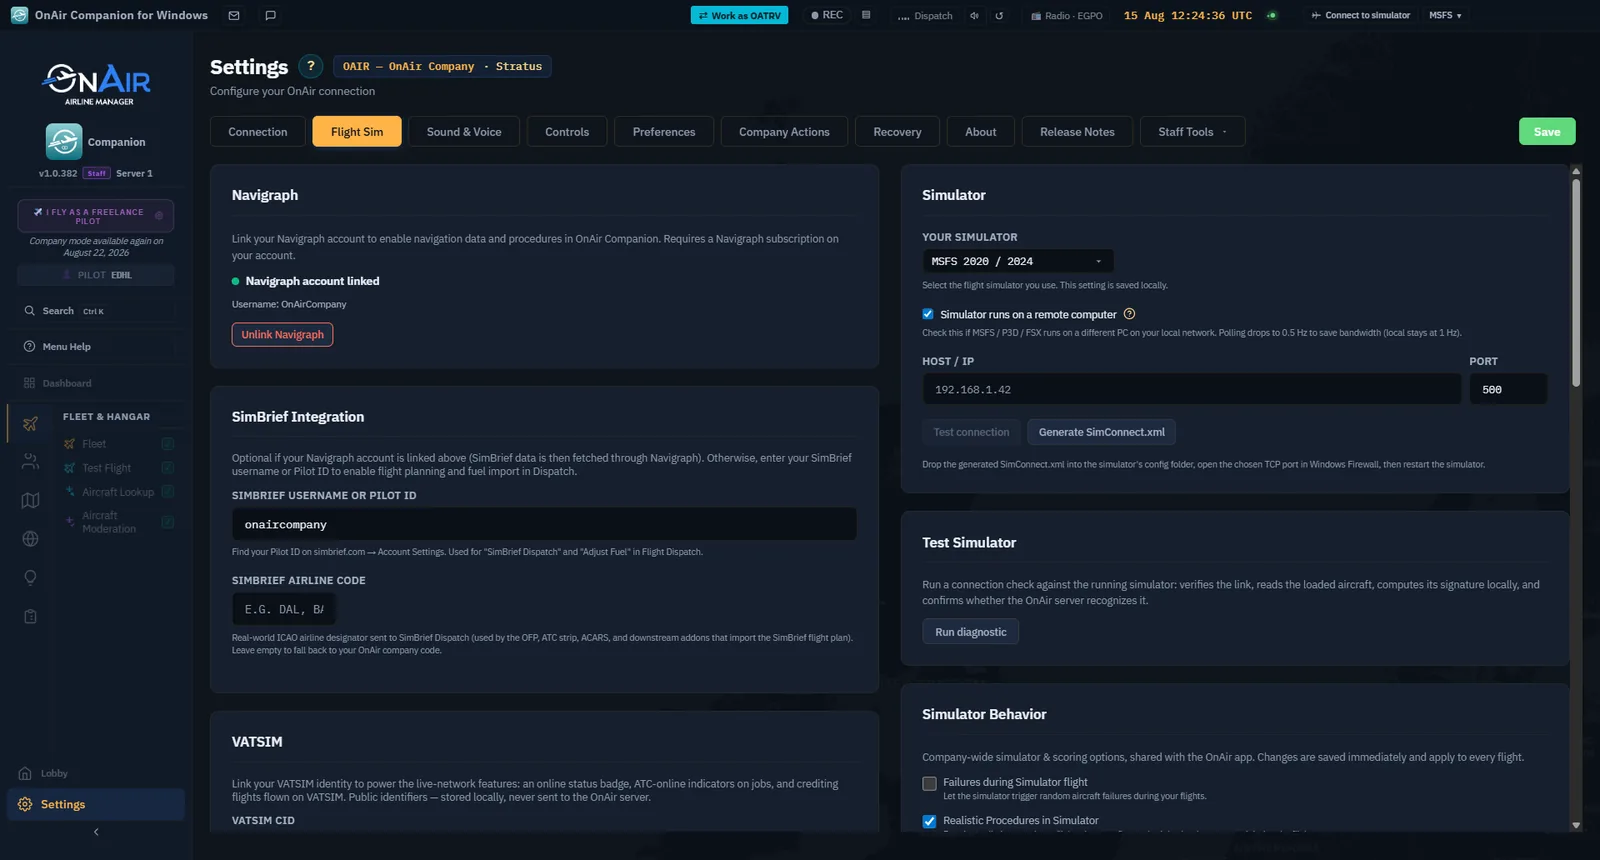
One generation is enough — the SimConnect.xml is portable. If you reinstall the Companion but keep the same sim PC, the file stays valid.macOS / Linux — On non-Windows hosts, the remote toggle is forced on: there is no local SimConnect bridge to talk to, so MSFS must live on a separate Windows machine and you must enter its IP.
X-Plane 12 — plugin or Web API
X-Plane offers two ways to talk to the Companion. Pick one — they do the same job.
Option A — X-Plane 12 plugin (works for X-Plane 11 too)
This is the classic link: a small plugin that the Companion can install and update for you.
- In Settings → Flight Sim, choose X-Plane 12 plugin.
- Use the X-Plane folder browser to point at your X-Plane install directory.
- Click Install / Update plugin. The Companion copies the plugin into
<X-Plane>/Resources/plugins/and the status pill flips to Up to date. - Restart X-Plane if it was already running.
- Click the SIM pill. It turns green within a few seconds.
For a remote setup, enable the remote toggle on the same page and enter the simulation PC's hostname — the plugin sends its telemetry over the network, no file to generate.
Option B — X-Plane 12 Web API (12.4.0+)
X-Plane 12.4.0 added a built-in HTTP API the Companion can use directly, with no plugin to install.
- In Settings → Flight Sim, choose X-Plane 12 Web API.
- Enter the port X-Plane exposes (default
8086). - In X-Plane, open Settings → Network and make sure the "Disable incoming" option is unchecked — the Companion needs to be allowed to talk to the sim.
- Click the SIM pill. It turns green within a few seconds.
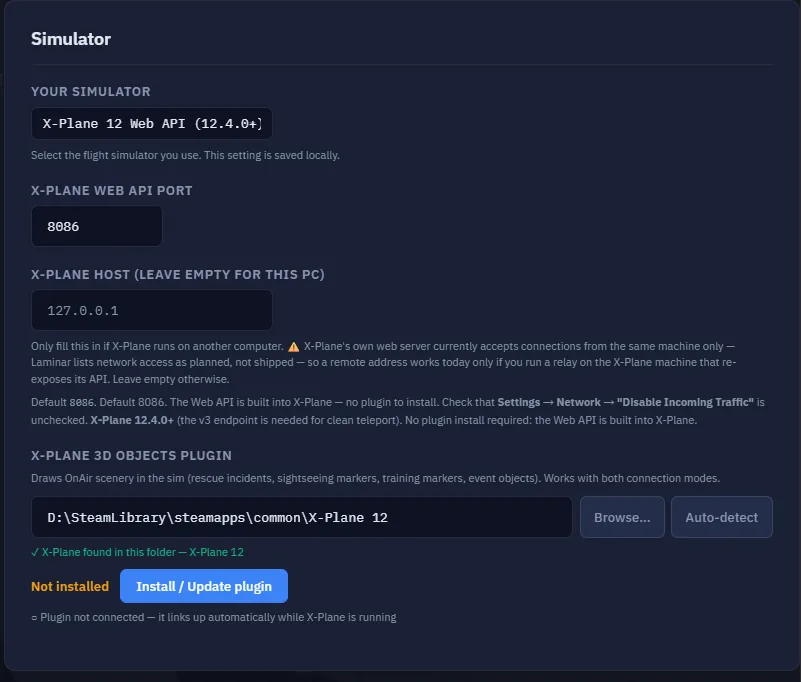
Plugin or Web API? — Both work. The plugin is the most battle-tested route; the Web API is lighter and avoids the install/update cycle. If you're brand new to OnAir, the plugin is the safe default.
Prepar3D / FSX
Prepar3D (v4, v5, v6) and FSX (FSX-SE / FSX) both rely on the same SimConnect mechanism as MSFS.
- In Settings → Flight Sim, choose Prepar3D or FSX.
- Launch the simulator and load (or park) an aircraft.
- Click the SIM pill.
For a remote setup, the procedure is identical to MSFS: tick Simulator runs on a remote computer, generate the SimConnect.xml, drop it on the sim PC, open port 500, restart the sim, then enter Host / IP + Port and click Test connection.
Where does SimConnect.xml go? — For P3D, the helper modal points at the version-specific%APPDATA%\Lockheed Martin\Prepar3D vN\folder; for FSX, at%APPDATA%\Microsoft\FSX\(or the FSX-SE equivalent). The Companion picks the right path for you — just follow the on-screen folder.
Without a simulator (Tycoon mode)
You can browse and manage your company without a live simulator connection. That alone does not change the company's without-simulator setting (NoSimulator) or turn a Freelance flight into an AI flight.
Where the world permits AI flying, eligible aircraft and crew can execute flights on the server. The server progresses and completes those flights; you cannot simply declare an arrival and credit a flight manually. Freelance loaners cannot use the AI dispatch path, and Thunder requires human flights.
To return to simulator flying, check both the company's simulation setting and the connection setup described above. Selecting a simulator in the title bar only selects the connection; it does not override the company's operating mode.
The Test Simulator panel — 5-step diagnostic
Open Settings and locate Test Simulator in the simulator settings, then click Run diagnostic. The diagnostic checks the selected simulator in five stages:
- Connect — can the bridge reach the simulator at all?
- Aircraft — is an aircraft loaded and are its core SimVars readable?
- Systems — are systems (engines, fuel, electrical, gear) reporting plausible values?
- Local signature — local hash of the loaded addon, used by the moderation system.
- Server match — does that signature match what the OnAir server has on file for this addon?
Each step turns green or red as it runs. A red row tells you exactly which layer is broken, which is far more useful than the SIM pill alone when you're troubleshooting a stubborn remote setup or a freshly installed addon.
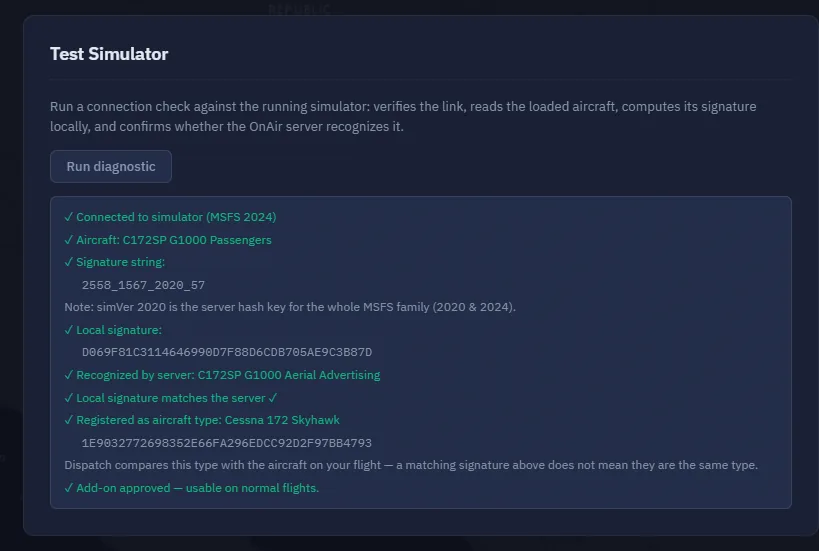
It's not working — diagnosing
| Symptom | Probable cause | Action |
|---|---|---|
| Pill stays neutral ("Sim not connected") | You haven't clicked the pill since launching the sim. | Click the pill once the sim is at the menu. |
| Pill stays orange ("Connecting…") for more than ~15 s | Bridge or remote port is reachable but never finishes the handshake. | Make sure the sim is fully loaded (not on a black loading screen). Disconnect and retry. |
| Pill red, local MSFS / P3D / FSX | Sim isn't exposing SimConnect (rare), or the wrong sim is selected. | Restart the sim with focus on its window; double-check the picker matches what's running. |
| Pill red, remote SimConnect | Firewall is blocking the port, IP is wrong, or SimConnect.xml wasn't deployed on the sim PC. | Ping the sim PC's IP from the Companion's PC; open port 500; re-generate and re-copy SimConnect.xml. |
| Pill red, X-Plane plugin | Plugin missing, outdated, or X-Plane was restarted before the install finished. | Open Settings → Flight Sim, hit Install / Update plugin, then restart X-Plane. |
| Pill red, X-Plane Web API | Wrong port, or "Disable incoming" is enabled in X-Plane's Network settings. | Match the port in the Companion to X-Plane's, then uncheck Disable incoming in X-Plane Settings → Network. |
| Pill green but the aircraft / airport looks wrong | Aircraft just spawned, SimVars not yet served. | Move the aircraft or start an engine — the data refreshes within seconds. |
Run the Test Simulator panel first — when you're stuck, Settings → Flight Sim → Test Simulator tells you which of the five layers is failing in plain language. It's almost always faster than guessing from the pill colour.
One sim at a time — Don't try to keep MSFS and X-Plane both running and switch the picker mid-flight. Pick one, connect, fly. The titlebar dropdown is for "I always fly X-Plane on Tuesdays and MSFS on Wednesdays" convenience, not for hot-swap mid-flight.
You now know how to…
- Recognize the state of your sim connection at a glance from the SIM pill.
- Configure MSFS 2020, MSFS 2024, Prepar3D, FSX, X-Plane 12 (plugin or Web API), or stay in Tycoon mode.
- Set up a remote connection when the sim lives on another PC.
- Run the Test Simulator diagnostic and read its five steps.
- Diagnose a red pill from the symptom table.
Step 1 of the welcome banner turns green as soon as the Companion logs at least one successful connection. Time to see the screen you'll come back to every session.
Still stuck? Ask on Discord or open a support ticket.
1.3 The Dashboard — your home & map of the app
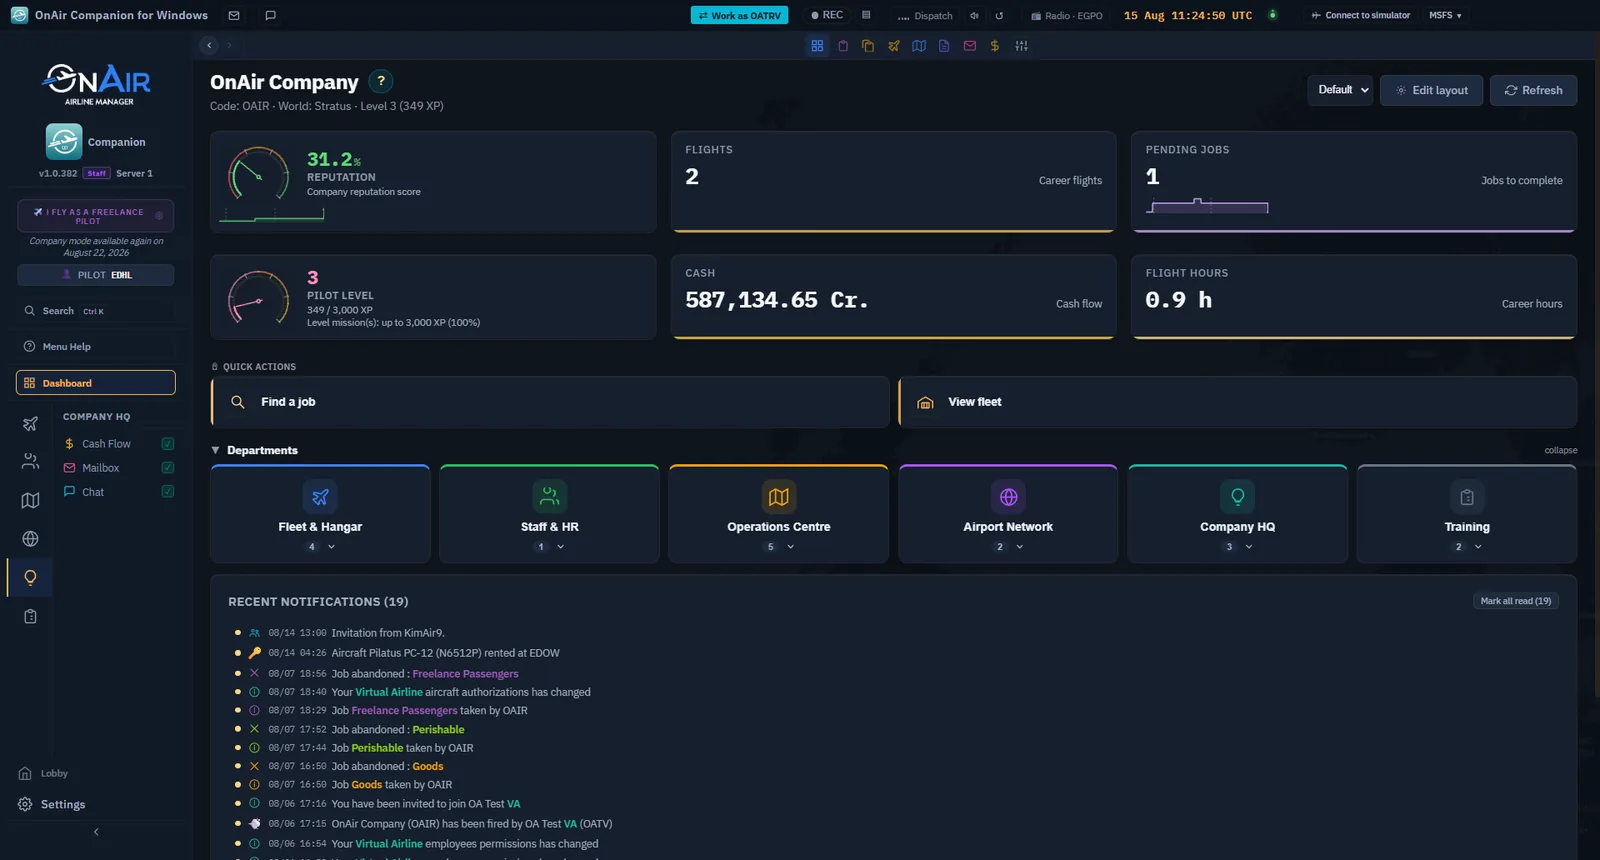
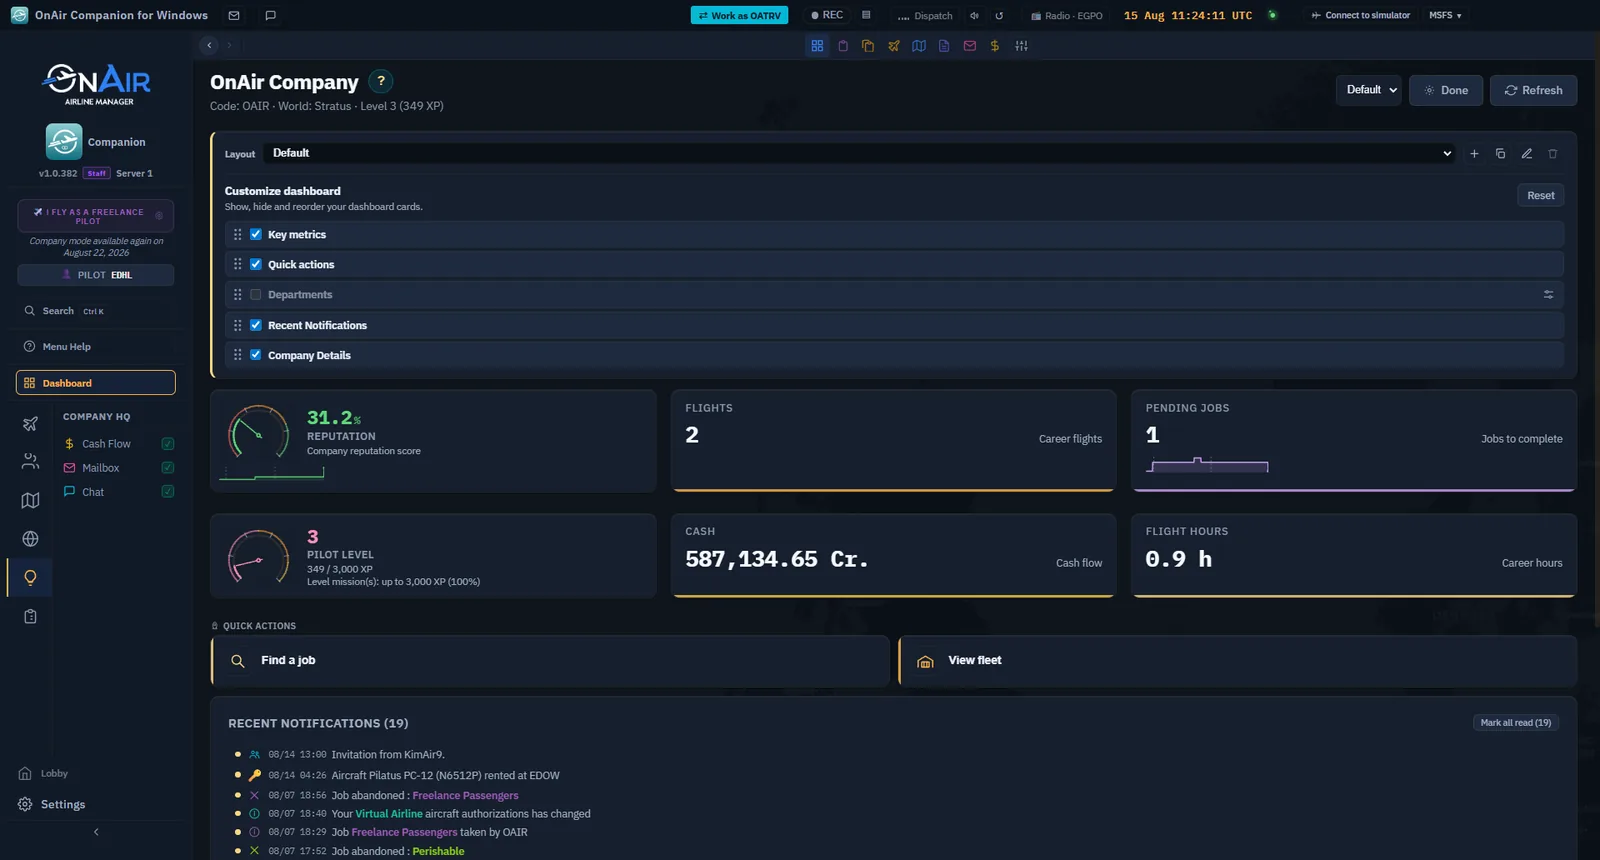
The Dashboard is your home page — the screen you land on when you resume your company. Since the Operations Hub redesign it is a personalizable board of widgets: a scrollable column of cards (departments, quick actions, stats, notifications, company details) that you can reorder, hide, and tune. It also doubles as your map of the whole app: the sidebar on the left and the Departments widget both list every menu you'll use, organized the same way.
The big picture
When you land on the Dashboard, you're looking at a column of widgets, stacked top to bottom. On a fresh freelance company the default order is:
- The welcome banner (until your 3 onboarding steps are done — see The Welcome Banner below).
- The stats grid — six tiles covering money, progression and workload.
- The Quick Actions row — one-click task launchers.
- The Departments widget — big shortcut tiles mirroring the sidebar.
- The Notifications widget — your live event feed.
- The Company details widget — identity and settings of your company.
Every one of these (banner aside) is a widget: you can hide it, move it, or tweak it from the Edit button in the header (the Dashboard layout editor below). If a flight is live, a blue Resume your flight banner also appears near the top and jumps straight back to the tracker.
The page header & the global pills
At the top of the page sits the page header — the same pattern you'll find on every screen:
- The page title — on the Dashboard this is your company name, with code, world and level on the line below; every other page shows the page's own name. Next to it, a
?button opens contextual help for the current screen. - The company pill — your airline code, company name and world. If you belong to a Virtual Airline, clicking it lets you switch identity.
- The layout selector + Edit button — Dashboard-specific: pick a saved layout preset, or open the editor to customize the board (the Dashboard layout editor below).
- The Refresh button — reloads the page data.
Two global pills live in the app's title bar (visible on every page, not just here):
- SIM pill — the connection state of your simulator: grey (idle), red (error), green (connected). See §1.2.
- Tracking pill — appears only while a flight is being tracked; shows the live phase and jumps back to the tracker from anywhere. See the Fly & register section.

Tip — the command palette — Press Ctrl+K (Cmd+K on Mac) anywhere to open a search palette: type a page name and jump straight to it. Faster than the sidebar once you know your way around.
The sidebar — map of every menu
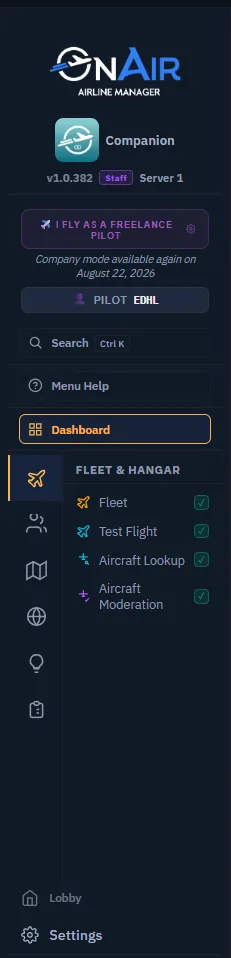
The left sidebar is organized in departments — the same taxonomy in Freelance and Career mode, so nothing moves when you graduate. Freelance simply shows the subset of pages a solo pilot needs.
At the very top, above the departments, sits a standalone Dashboard button — your home is always one click away. At the very bottom, a Settings button opens the app settings (the Daily Tools reference).
The departments and what's inside, in Freelance mode:
| Department | Menu | What it's for | Covered in |
|---|---|---|---|
| Fleet & Hangar | Fleet | Your current (loaned) aircraft. | the Daily Tools reference |
| Staff & HR | Ranks | Your progression — Pilot Ranks + Routes Ranks. | the Daily Tools reference |
| Operations Centre | Freelance Job | The jobs hub: charters, routes, tours, VA. | the Find your first job section |
| Airport Network | Airport Lookup | Any airfield: runways, METAR, jobs. | the Daily Tools reference |
| Company HQ | Cash Flow | Income and outflows, line by line. | the Daily Tools reference |
| Training | Flight Training | Practise a manoeuvre outside a paid flight. | the Daily Tools reference |
Two pages are deliberately not in the sidebar:
- Flight Dispatch — always reached by acting on something: the Dispatch button on a Fleet row, Fly Now on a job, or Resume on a flight in progress. It needs a selected aircraft, so it can never be opened on its own. See the Dispatch section.
- Tours — reached from the Tours card on the Freelance Job page. See the Find your first job section.
Note — In Career mode the same departments simply gain more entries (Aircraft Market, Work Orders, Employees, FBOs, Industry…). The structure — and your muscle memory — stays identical. See chapter 6, Growing into Career mode.
The Welcome Banner (the 3 steps)
Until you've completed your first flight, a banner at the top of the Dashboard tracks the 3 milestones that get you airborne:
- Connect your simulator — turns green when the SIM pill has been green at least once.
- Find your first job — turns green when at least one job sits in your Pending Jobs queue, or a tour is in progress.
- Fly & register — turns green once your first flight has been registered after landing.
Each step is clickable and carries its own ? for inline help. You don't have to click anywhere to validate a step — it turns green on its own when its condition is met. The banner disappears once all 3 steps are green; if you close it manually, a confirmation asks first (it won't come back). It also carries a link to the OnAir Discord if you'd rather ask a human.
These 3 steps map directly to the chapters of this guide:
- Step 1 — Connect your simulator → §1.2.
- Step 2 — Find your first job → the Find your first job section.
- Step 3 — Fly & register → the Fly & register section.

Departments widget & Quick Actions
Departments and Quick Actions provide navigation shortcuts. Their visibility and position depend on your Dashboard layout. If Departments is not shown, open Edit layout and tick Departments to display it:
- Departments — one large tile per sidebar department. Click a tile and a flyout opens listing that department's pages as chips; click a chip to navigate. It's the same map as the sidebar, in a more visual form — and while it's shown, the sidebar can auto-collapse to give the board the full width (that behaviour is a widget option, see the Dashboard layout editor below).
- Quick Actions — a row of task-oriented buttons. In Freelance mode: Find a job (opens the Freelance Job page) and View fleet (opens Fleet).

The stats grid
The stats grid gives you the at-a-glance state of your career — six tiles in two rows. Every tile is clickable and opens the matching page.
| Tile | Type | Reads |
|---|---|---|
| Reputation | gauge | your reputation 0–100 % (red < 40 %, orange 40–75 %, green > 75 %). |
| Flights | counter | total registered career flights. |
| Pending Jobs | counter | jobs accepted but not yet flown. |
| Pilot Level | XP gauge | progress within your current level — the gauge warms up as you near the next one (pink → orange → gold). |
| Cash | counter | your available funds. |
| Flight Hours | counter | total career flight hours. |

Notifications & Company details
Two more widgets complete the default board:
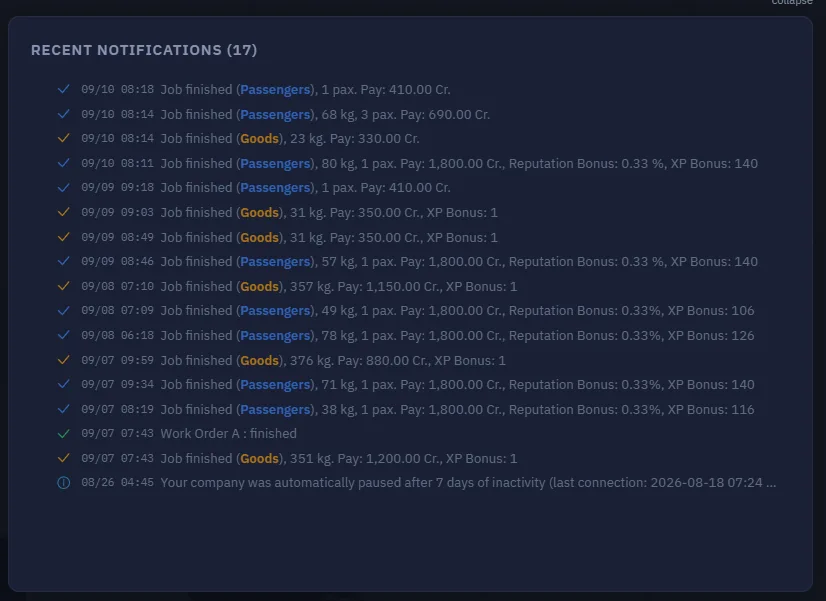
- Recent Notifications — the live feed of everything the server flags: job finished, level-up, fuel event, mailbox arrival, world event… Each row has a type icon, a timestamp and a one-line description; unread entries carry a dot, a mark-all-read action sits in the header, and clicking a row navigates to the relevant page. The list scrolls inside the card — it's the full feed, not a teaser.
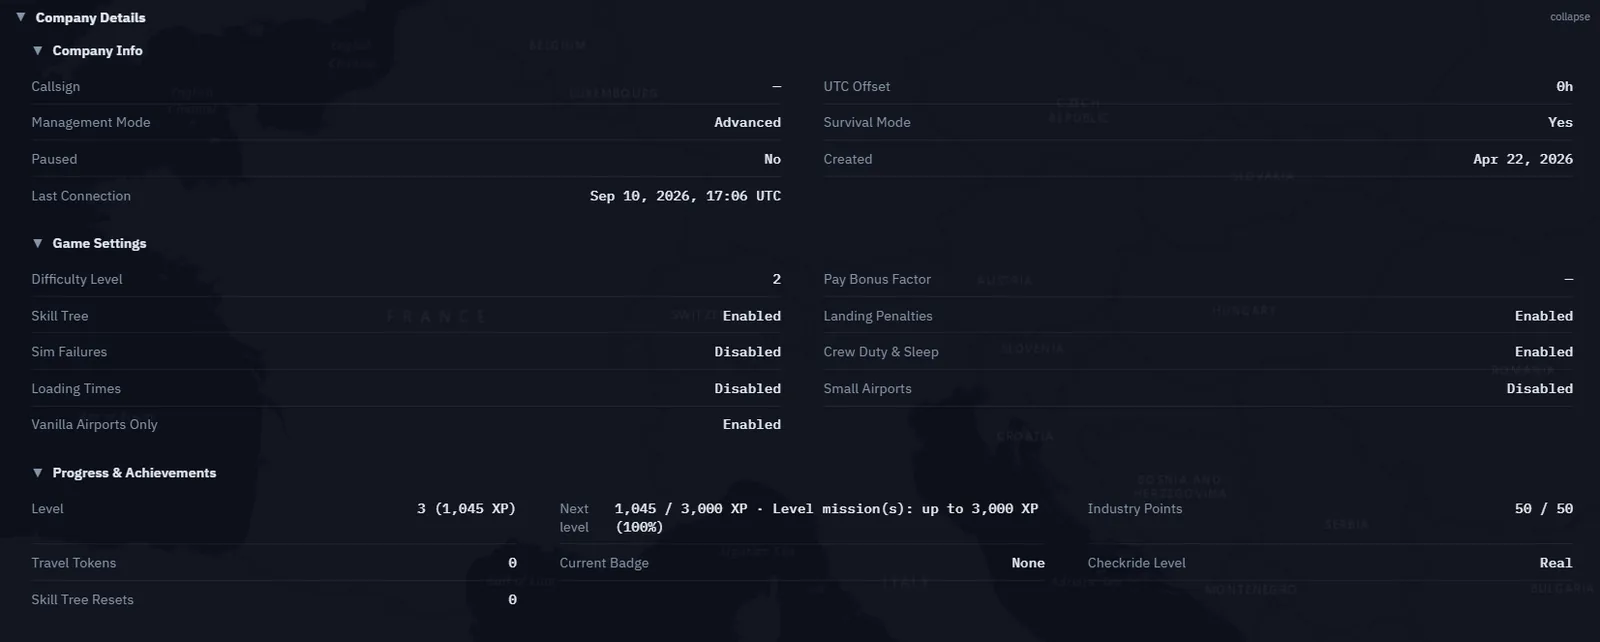
- Company details — a collapsible card (closed by default) with three sub-groups: Info (callsign, UTC offset, mode, creation date, last connection), Settings (difficulty, pay bonus factor, penalties…) and Progress (level + XP, travel tokens, badge…). Open it when you need to check a company setting; your daily loop won't need it.
Make it yours — the layout editor
Click Edit layout in the header to open the layout editor:
- Show / hide any widget (the Departments widget, for example, is a matter of taste — some prefer the sidebar alone).
- Reorder widgets by dragging them up or down.
- Widget options — some widgets expose settings; the Departments widget can auto-collapse the sidebar while you're on the Dashboard.
- Layout presets — save named layouts and switch between them from the header selector (e.g. a minimal "flying day" board vs a full "management" board).
Your layout is remembered per company and per mode — your freelance board and a future career board live separately.
You now know how to…
- Read the page header and the two global pills (SIM, Tracking).
- Navigate with the sidebar departments, the Departments widget, or the Ctrl+K palette — and know which chapter covers each menu.
- Use the welcome banner as your onboarding checklist.
- Launch your two most common tasks from Quick Actions.
- Read the stats grid — reputation, level, cash, flights, hours, pending work.
- Follow your notifications and check your company details.
- Customize the board — hide, reorder, tune and save layouts.
The Dashboard tells you what is. To make new things happen — and to tick Step 2 of the welcome banner — head to the Freelance Job page.
Continue with Chapter 2 — Start in Onboarding Mode to understand your starting capital and mode choices, then Chapter 3 — Complete Your First Freelance Charter.